-
Logic báo cáo: File thiết kế
-
Báo cáo học tập MJ 4.0: Thiết kế class, architechture, thiết kế DB.
-
Event học tập: Thiết kế event
-
Config môi trường Dev / Production: Config Environment
Hệ thống Đồng bộ và báo cáo:
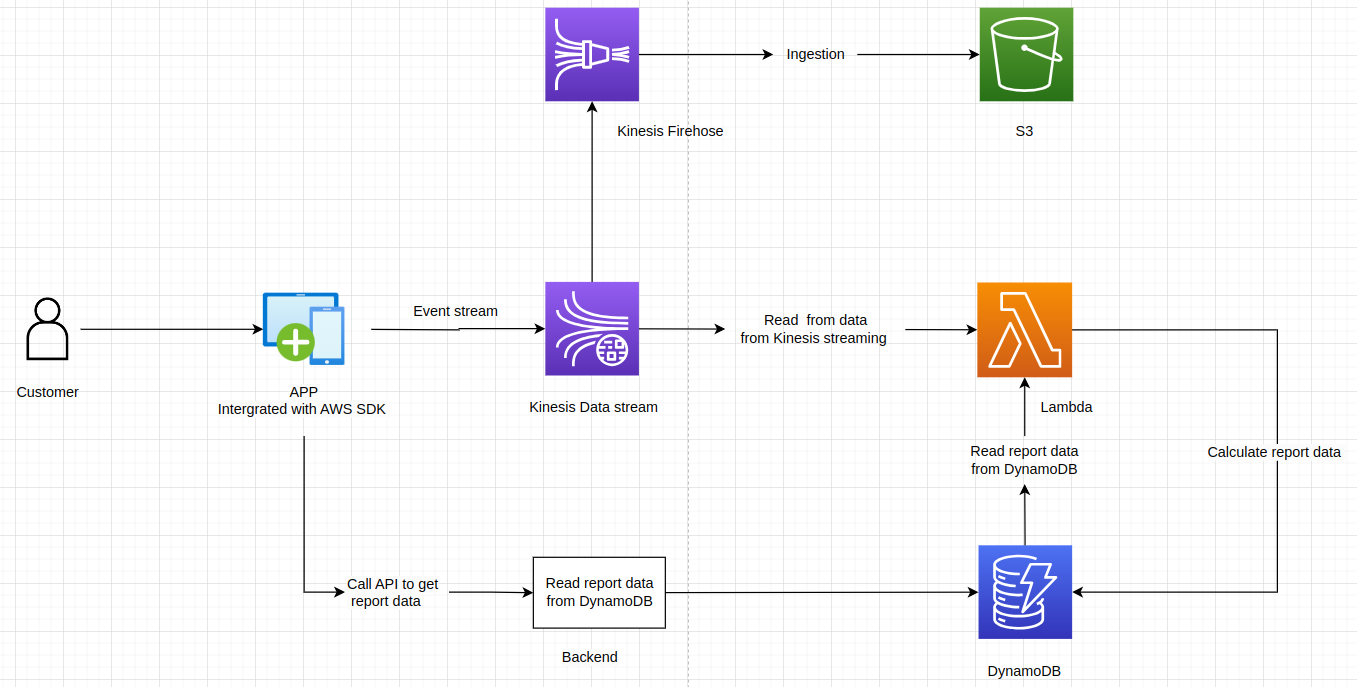
Hệ thống sử dụng kinesis để lắng nghe stream event từ người dùng, sau đó sử dụng lambda để đọc từ kinesis, và đọc từ DB là DynamoDB để xử lý dữ liệu đồng bộ và báo cáo
Xử lý song song nhiều nhiều event
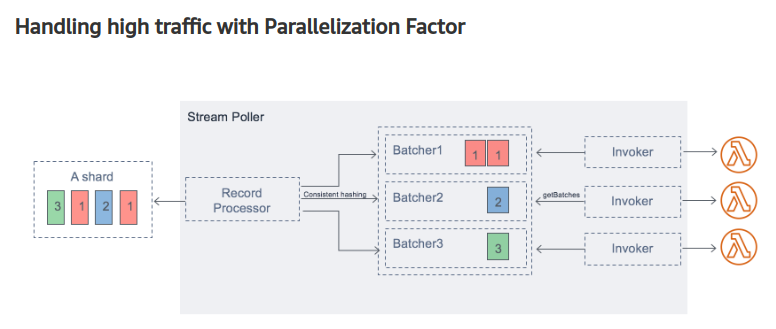
Vài tại một thời điểm có thể đến cả 1000 event/s nên những event bắn lên cần phải xử lý song: Cần setup kinesis có nhiều shard, cho mỗi shard-id phải có nhiều hàm lambda song xử lý.
https://aws.amazon.com/blogs/compute/new-aws-lambda-scaling-controls-for-kinesis-and-dynamodb-event-sources/
Biểu đồ luồng:
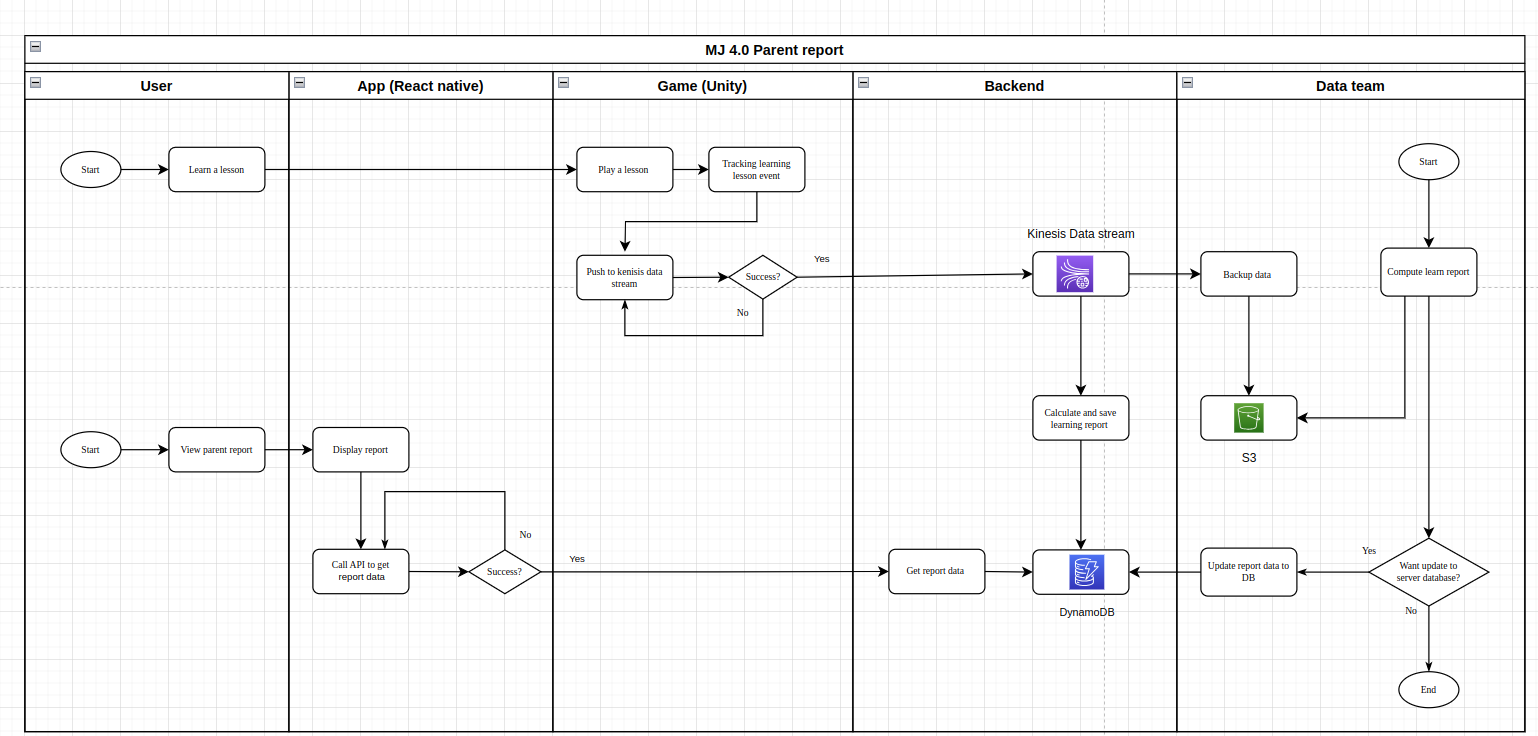
Chi tiết luồng tương tác của: User, React, Unity, Backend, và Team data được trình bày ở hình trên.
Thiết kế event:
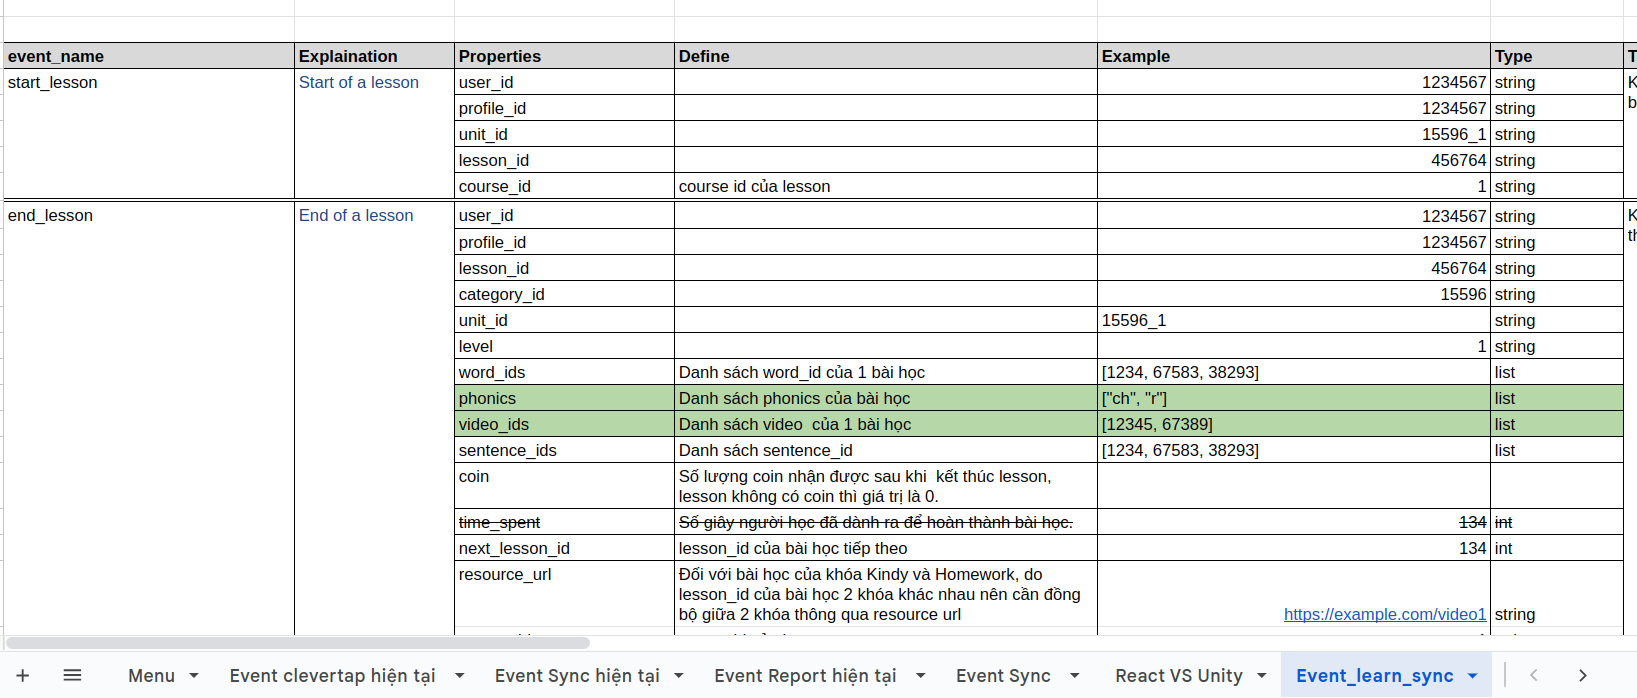
Step1: Backend thiết kế event properties cần app bắn lên. Format:
{
"time_record": , //timestamp event is recorded
"event_name": ,
"properties": {
// event properties
}
}
Step2: Bên Unity /React nhận thiết kế để bắn lên Kinesis. Lưu ý về partion key của event.
Step3: Check kinesis
Cấu trúc của project:
├── README.md          <- The top-level README for developers using this project.
├── configs
│   ├── configs.ini    <- Config for running mode
│   ├── dev_configs.ini    <- Config for dev mode
│   └── production_configs.ini  <- Production mode config
│
│
├── requirements.txt   <- The requirements file for reproducing the analysis environment
│
├── src                <- Source code for use in this project.
│   ├── __init__.py    <- Makes src a Python module
│   │
│   ├── api            <- Script for API
│   │   ├── parent_report  <- Scripts for parent report
│   │   ├── sync_mj_app  <- Scripts for get data lesson
│   │   ├── homework    <- Scripts for homework report
│   │   ├── upgrade    <- Scripts for upgrade MJ4 firestore to DynamoDB
│   │   ├── homework    <- Scripts for homework report
│   │   └── user_activity     <- Scripts for user activity report
│   ├── event          <- Scripts to process event from user
│   │   ├── event.py
│   │   ├── lesson_event.py
│   │   ├── change_topic.py
│   │   ├── handler.py  <- Scripts for  handle event
│   │   └── activity_event.py
│   │
│   ├── report         <- Scripts to process all objects of report
│   │   │
│   │   ├── lesson.py
│   │   ├── lesson_learned.py
│   │   ├── story.py
│   │   ├── story_learned.py
│   │   ├── activity.py
│   │   ├── skill_learned.py
│   │   └── parameters.py
│   ├── sync_data         <- Scripts to process all objects for sync_data
│   │   │
│   │   ├── lesson.py
│   │   ├── lesson_sync.py
│   │   ├── course.py
│   │   ├── homework.py
│   │   ├── score.py
│   │   ├── weely_challenge.py
│   │   └── award.py
│   │
│   ├── services       <- Scripts to connect and work with  AWS services, Redis.
│   │   │
│   │   └── aws.py
│   │
│   └── utils          <- Scripts to some commo fucntions
│       └── visualize.py
│
├── lambda_function.py <- Lambda function handlers for processing streaming event
├── configs.py         <- Read and processing services
└── main.py            <- Main file for starting API server.
Xử lý khi có event mới
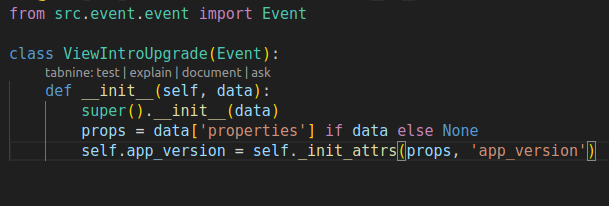
- Khi có event mới trong folder src/event tạo 1 class mới cho event, class mới này kế thừa từ base class event.
Ví dụ:
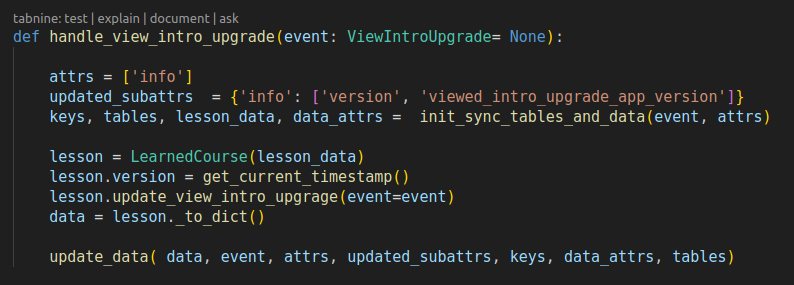
- Trong file src/event/handler.py viết function để xử lý event:
- Cập nhật trong hàm lambda_function.py, để khi có event này được bắn lên Lambda sẽ bắt và gọi đến logic code trong handler để xử lý:
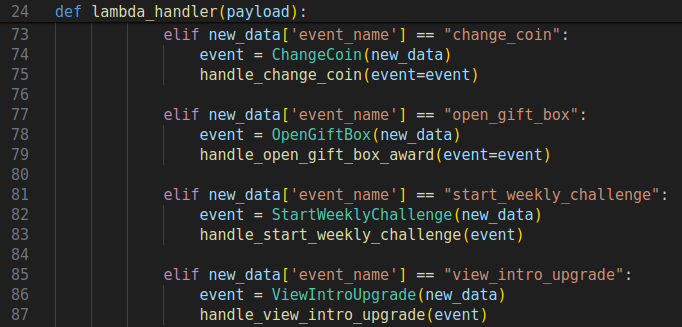
Ví dụ dòng code: 85-87
Viết API, call API:
Trong folder src/api có chia thành các folder tương ứng với api cho các project khác nhau sử dụng Fast API
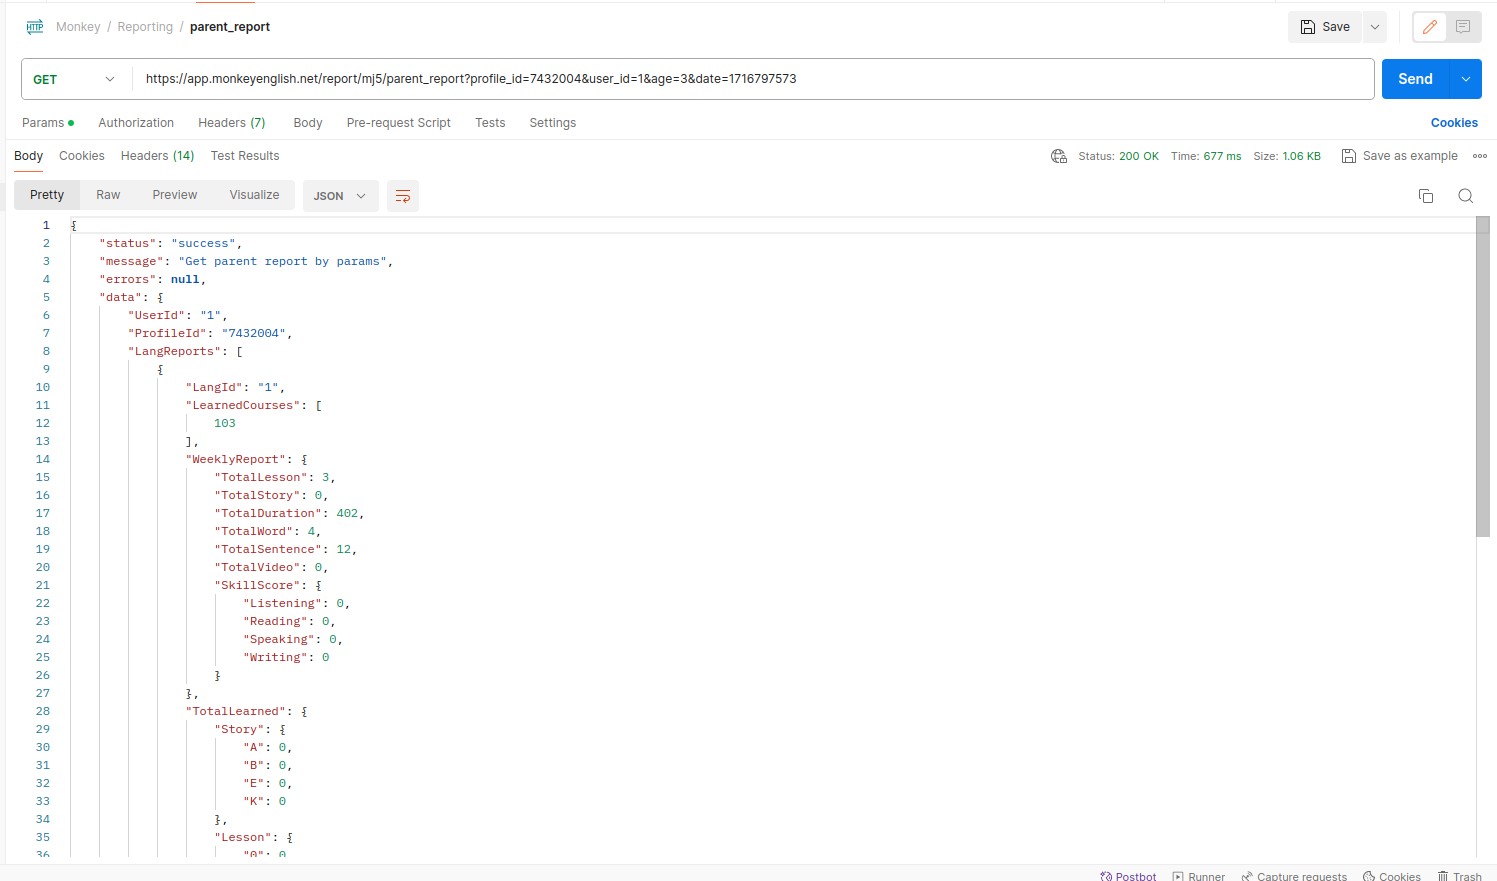
Trong trường hợp cần cập logic của báo học tập thì vào folder: src/api/parent_report để sửa.
Api call:
Deployment:
deploy lambda:
Zip code and deploy lambda :
+) Lambda dev: https://ap-southeast-1.console.aws.amazon.com/lambda/home?region=ap-southeast-1#/functions/handle_app_event?tab=code
+) Labmda live: https://ap-southeast-1.console.aws.amazon.com/lambda/home?region=ap-southeast-1#/functions/handle_mj_app_event?tab=code
CI/CD:
Testing:
deploy API:
MJ 4.0 parent reporting
This is repository of the Parent report of Monkey Junior 4.0
How to use
To run the local with dev mode please install docker before, after that use 'docker-compose-dev.yaml'
docker-compose up -d --build
Develop mode
Running the source with develop model. Following step by step:
- Create new python venv
python3 -m venv venv

source venv/bin/active
- Install requirements
pip3 instal -r requirements.txt
- Start services by running the main file
Default will be ran with dev configs
python3 main.py
Production model
To export model for production use docker. Please setup and install docker:
docker-compose up -d --build
