Groups
-
trunghoang12
posted in Data_team • read moreTài liệu dự án Text2SQL
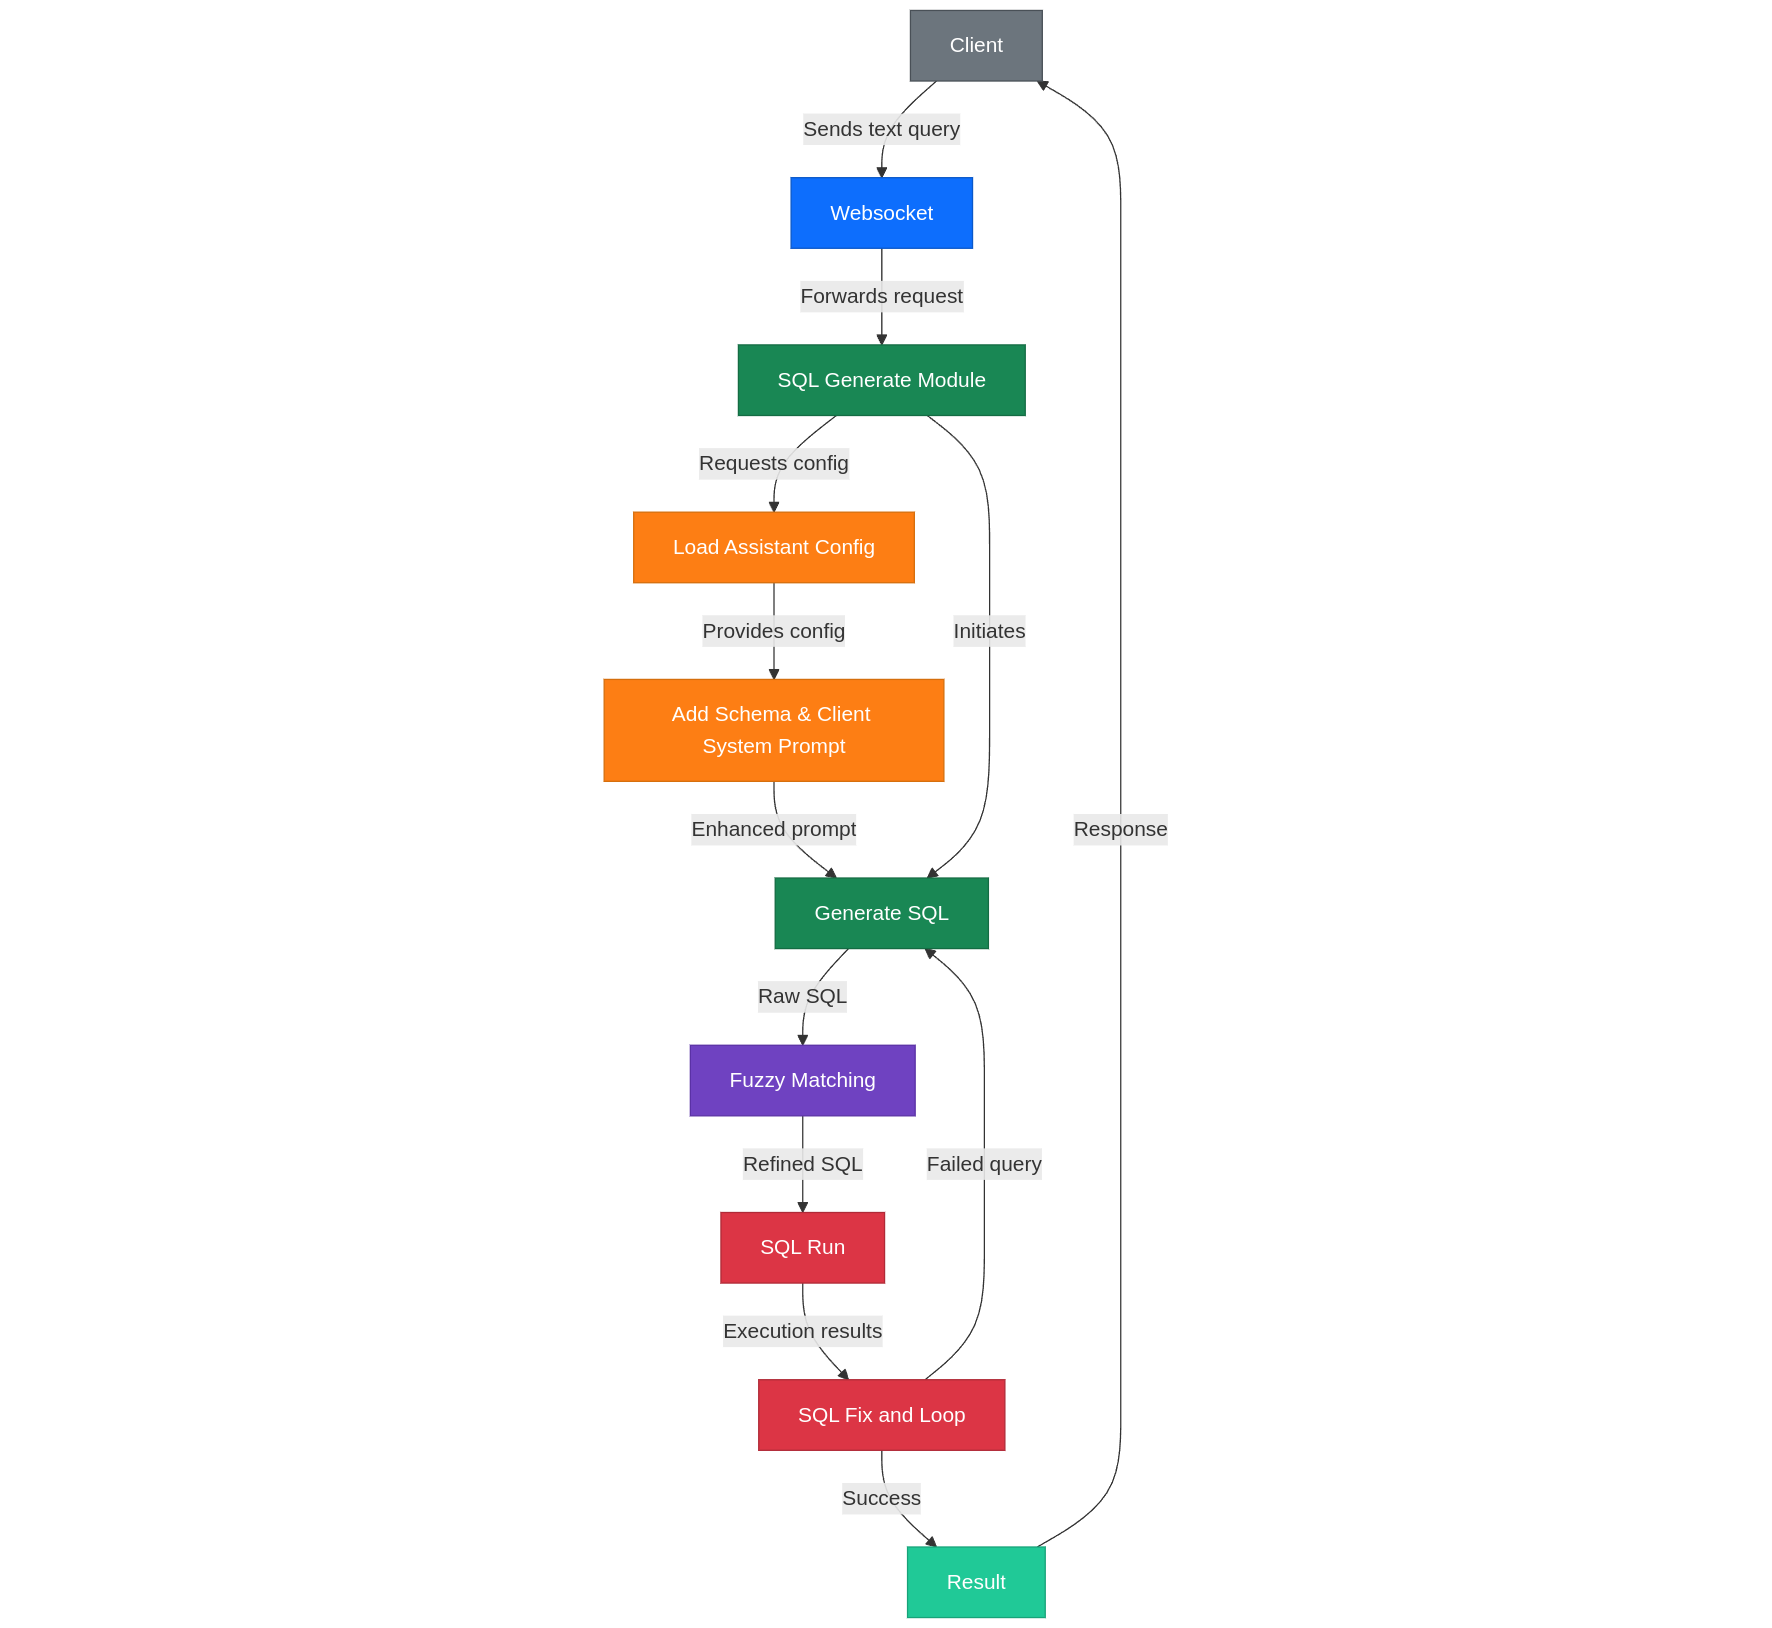
1. Sơ đồ tổng quan hệ thống
Luồng sử dụng
Khởi tạo:
- Tạo data group: Người dùng chọn danh sách table và columns trong Redshift thông qua giao diện web
- Tạo chatbot: Người dùng tạo chatbot với data group đã chọn
- Đăng nhập: Web sử dụng xác thực Google kết nối với email CRM của Monkey
Sử dụng:
- Chat và truy vấn: Người dùng tương tác với chatbot để truy vấn dữ liệu trên data group đã chọn
- Hiệu chỉnh schema: Người dùng có thể đọc và sửa schema nếu cần để nâng cao độ chính xác
Luồng Text2SQL
Kết nối:
- Client → WebSocket → Server → SQL Module
SQL Module:
- Data Group Selection: Lựa chọn nhóm dữ liệu để truy vấn
- SQL/Code Generation: Sinh mã SQL dựa trên văn bản đầu vào
- Fuzzy Search: Sửa giá trị một số trường thông qua tìm kiếm fuzzy
- Run và Feedback: Thực thi SQL và cung cấp phản hồi
Xử lý bất đồng bộ:
- Sử dụng Redis Queue để thực thi SQL, tránh block luồng chính
- Mỗi trạng thái khi chạy được stream về phía client qua WebSocket
Lưu trữ:
- Lịch sử chat được lưu vào MongoDB, collection
edu_backend.user_chat_logs
Cấu trúc dữ liệu chat trong MongoDB:
{
    "_id": { "$date": "2024-12-31T11:35:41.510Z" },
    "updated_at": { "$date": "2024-12-31T11:35:41.510Z" },
    "message_count": 0,
    "is_active": true,
    "is_archived": false,
    "tags": [],
    "metadata": {}
}
Công nghệ sử dụng:
- Backend: Python FastAPI
- Xác thực: Google OAuth
- Queue xử lý: Redis Queue
- Cơ sở dữ liệu:
- Nguồn dữ liệu chính: Redshift
- Lưu trữ cấu hình và chat: MongoDB
- Giao thức kết nối: WebSocket
2. Sơ đồ xử lý Text2SQL
-
posted in Data_team • read more
Mô Tả Luồng: Lập Lịch & Gửi Thông Báo AI-Powered qua Firebase
Luồng này mô tả quy trình từ việc tạo nội dung thông báo bằng AI, lên lịch gửi, xử lý bởi backend, gửi qua Firebase và theo dõi kết quả.
Giai đoạn 1: Tạo Prompt Thông Báo
- Người dùng (Admin/Content Creator): Truy cập giao diện người dùng (UI) tại
https://github.com/eduhub123/edu_scheduler_notifier/tree/master/front-end. - Tạo Prompt:
- Sử dụng trình soạn thảo hoặc các trường nhập liệu trên UI để định nghĩa template cho prompt.
- Tham khảo các template có sẵn trong UI để có cấu trúc phù hợp.
- QUAN TRỌNG: Đảm bảo nội dung prompt khi được AI xử lý sẽ tạo ra kết quả có định dạng chính xác:
Title: <Nội dung tiêu đề thông báo>
Body: <Nội dung chi tiết thông báo>
3. Lưu Prompt:
* Sau khi hoàn tất, người dùng lưu prompt lại.
* Hệ thống (Backend Go): Nhận yêu cầu lưu prompt.
* Lưu trữ (MongoDB): Thông tin cấu hình prompt (template, tên, các tham số liên quan) được lưu vào collectionedu_backend.go_prompts.Giai đoạn 2: Tạo và Lập Lịch Job Gửi Thông Báo
-
Người dùng (Admin/Scheduler): Truy cập giao diện quản lý Lập lịch (Scheduler UI - có thể là một phần của front-end trên).
-
Tạo Job Mới:
- Chọn Prompt đã tạo ở Giai đoạn 1 để sử dụng cho job này.
- Chọn Ứng Dụng (App): Chỉ định rõ thông báo này sẽ được gửi đến người dùng của ứng dụng nào (ví dụ: App Học Sinh, App Giáo Viên).
- Cấu hình Lịch trình: Đặt thời gian gửi (gửi ngay, gửi một lần vào thời điểm cụ thể, gửi định kỳ - ví dụ: hàng ngày, hàng tuần).
- Cấu hình Đối tượng (Segmentation): Định nghĩa tiêu chí để lọc danh sách người dùng/thiết bị nhận thông báo (ví dụ: query dựa trên lớp học, khóa học đã đăng ký, hoạt động gần đây...).
- Cấu hình Hành động (Actions):
- QUAN TRỌNG: Trong danh sách các hành động có thể thực hiện, chọn chính xác
send_notification_for_a_segmentation_device. Hành động này chỉ định job sẽ gửi thông báo Firebase đến một nhóm người dùng đã được phân đoạn.
- QUAN TRỌNG: Trong danh sách các hành động có thể thực hiện, chọn chính xác
-
Lưu và Kích hoạt Job:
- Người dùng lưu cấu hình job.
- Người dùng kích hoạt (activate) job để đưa vào trạng thái sẵn sàng chạy theo lịch.
- Hệ thống (Backend Go): Nhận yêu cầu lưu và kích hoạt job.
- Lưu trữ (MongoDB): Thông tin cấu hình job (ID prompt, lịch trình, query phân đoạn, app target, trạng thái
activate...) được lưu vào collectionedu_backend.schedule_jobs.
Giai đoạn 3: Xử Lý Job và Gửi Thông Báo (Tự động bởi Backend)
-
Scheduler Trigger (Backend Go): Dựa trên lịch trình đã cấu hình trong
schedule_jobs, hệ thống Go xác định job nào cần chạy tại thời điểm hiện tại (job có trạng tháiactivatevà đúng giờ). -
Lấy Thông Tin Job: Hệ thống truy xuất thông tin chi tiết của job cần chạy từ
edu_backend.schedule_jobs. -
Xử lý Prompt với AI:
- Lấy template prompt từ
edu_backend.go_promptsdựa trên ID prompt trong job. - Gọi API của AI Model đã cấu hình (Gemini hoặc OpenAI GPT) với template prompt làm đầu vào.
- Nhận kết quả từ AI là nội dung thông báo hoàn chỉnh theo định dạng
Title:vàBody:.
- Lấy template prompt từ
-
Phân Đoạn Người Dùng (Segmentation):
- Thực thi query phân đoạn (đã định nghĩa trong job) trên cơ sở dữ liệu người dùng/thiết bị để lấy danh sách các Firebase device token của những người dùng thỏa mãn điều kiện.
-
Chia Batch Token:
- Kiểm tra giới hạn Firebase: Hệ thống biết rằng Firebase có giới hạn gửi (ví dụ: 500 token/request).
- Nếu danh sách token lấy được lớn hơn giới hạn, hệ thống sẽ chia danh sách này thành nhiều batch nhỏ hơn (mỗi batch tối đa 500 token).
-
Đưa Batch vào Hàng Đợi (Queue):
- Từng batch token được đưa vào một hàng đợi (queue) nội bộ do Go quản lý. Việc này giúp xử lý gửi tuần tự và tránh quá tải.
-
Gửi Thông Báo Từng Batch:
- Một hoặc nhiều worker (goroutine trong Go) sẽ lấy từng batch token ra khỏi queue.
- Với mỗi batch:
- Worker gọi Firebase Cloud Messaging (FCM) API để gửi nội dung thông báo (Title/Body đã tạo bởi AI) đến danh sách token trong batch đó.
- Log Gửi (MongoDB): Kết quả của việc gửi từng batch (thành công, thất bại, lỗi cụ thể nếu có, danh sách token) được ghi vào collection
edu_backend.log_notificaiton.
- Quá trình này lặp lại cho đến khi tất cả các batch trong queue đã được xử lý.
-
Log Kết Quả Job (MongoDB): Sau khi tất cả các batch của một job đã được gửi (hoặc gặp lỗi không thể tiếp tục), hệ thống ghi lại kết quả tổng thể của lần chạy job đó (thời gian bắt đầu/kết thúc, số lượng token xử lý, số lượng gửi thành công/thất bại, ID các log chi tiết liên quan) vào collection
edu_backend.schedule_logs. -
Cập nhật Trạng thái Job (MongoDB): Nếu là job chạy một lần, trạng thái có thể được cập nhật thành
inactivehoặccompletedtrongedu_backend.schedule_jobs. Nếu là job định kỳ, trạng tháiactivateđược giữ nguyên cho lần chạy tiếp theo.
Giai đoạn 4: Theo Dõi và Giám Sát
- Người dùng (Admin): Truy cập giao diện Dashboard.
- Xem Dữ Liệu:
- Dashboard hiển thị các chỉ số và biểu đồ trực quan về hoạt động gửi thông báo.
- Lọc theo App: Người dùng chọn đúng App mà họ muốn xem số liệu (ví dụ: xem tỷ lệ gửi thành công cho App Học Sinh).
- Dữ liệu được tổng hợp từ
edu_backend.schedule_logsvà có thể cảedu_backend.log_notificaitonđể cung cấp cái nhìn chi tiết (ví dụ: số job đã chạy, số thông báo đã gửi, tỷ lệ thành công/thất bại, xu hướng theo thời gian...).
- Phân Tích & Điều Chỉnh: Dựa trên dữ liệu dashboard, người dùng có thể đánh giá hiệu quả của các chiến dịch thông báo, xác định vấn đề (nếu có) và điều chỉnh lại prompt, lịch trình hoặc tiêu chí phân đoạn cho các job trong tương lai.
Tóm tắt Kiến trúc và Lưu trữ:
- Backend: Go (Xử lý logic lập lịch, gọi AI, phân đoạn, chia batch, quản lý queue, gọi Firebase API).
- Cơ sở dữ liệu: MongoDB.
edu_backend.go_prompts: Lưu cấu hình template prompt cho AI.edu_backend.schedule_jobs: Lưu cấu hình các job lập lịch (lịch trình, prompt ID, query phân đoạn, app target, action, trạng thái active/inactive).edu_backend.schedule_logs: Lưu lịch sử và kết quả tổng thể của mỗi lần chạy job.edu_backend.log_notificaiton: Lưu log chi tiết của từng lần gửi thông báo đến Firebase (theo batch hoặc từng token).
- AI Service: Gemini hoặc OpenAI GPT (Tạo nội dung Title/Body từ prompt template).
- Notification Service: Firebase Cloud Messaging (FCM) (Gửi thông báo push đến thiết bị người dùng).
- Frontend: Giao diện Web (
https://github.com/eduhub123/edu_scheduler_notifier/tree/master/front-end) để tạo prompt, lập lịch job và xem dashboard.
Luồng này đảm bảo quy trình khép kín, tự động và có khả năng mở rộng để gửi thông báo cá nhân hóa đến đúng đối tượng vào đúng thời điểm, đồng thời cung cấp khả năng giám sát hiệu quả.
- Người dùng (Admin/Content Creator): Truy cập giao diện người dùng (UI) tại
-
posted in Data_team • read more
Tài liệu Hướng dẫn Cấu hình Dữ liệu Hội thoại (Video Call & GPT Game)
Mục đích: Tài liệu này mô tả các bước cần thiết để chuẩn bị và cấu hình dữ liệu cho các tính năng hội thoại dựa trên video (Video Call) và GPT Game trong hệ thống SpeakUp.
Đối tượng: Lập trình viên, Kỹ sư QA, Quản lý nội dung hoặc bất kỳ ai chịu trách nhiệm thêm mới hoặc cập nhật nội dung hội thoại cho hệ thống.
Điều kiện tiên quyết:
- Tài khoản Google: Để truy cập và sử dụng Google Colab.
- Tài khoản AWS: Có quyền truy cập và tải lên (upload) file vào S3 bucket được chỉ định.
- Tài khoản GitHub: Có quyền truy cập (read/write) vào repository
edu_mspeak_dialogue. - Mã nguồn Project: Đã clone/pull mã nguồn mới nhất của project về máy local.
- Thông tin kết nối Database: Có thông tin (host, port, user, password, database name) của cơ sở dữ liệu MySQL LIVE.
- Video nguồn: File video gốc cần được xử lý.
- Kịch bản hội thoại: Nội dung chi tiết của hội thoại cần tạo.
Ví dụ kịch bản mẫu: Kịch bản video call - Leve 1_Body parts 1_U2_They're my hands..csv
Quy trình Chi tiết
Bước 1: Chuẩn bị và Xử lý Video Asset
-
Truy cập Tool Convert Video: Mở trình duyệt và truy cập vào Google Colab Notebook theo đường link sau:
https://colab.research.google.com/drive/12esgMOz4UGb9tKRQv2eMFyVNOZCWuthX?usp=sharing -
Kết nối Runtime: Đảm bảo bạn đã kết nối với một runtime trên Colab (Menu
Runtime->Connect to runtime). -
Tải Video Nguồn Lên: Upload file video gốc của bạn lên môi trường Colab theo hướng dẫn trong notebook (thường là qua panel Files bên trái hoặc dùng code upload).
-
Chạy Script: Thực thi các cell code trong notebook theo thứ tự. Cung cấp đường dẫn đến file video đã upload khi được yêu cầu. Script sẽ xử lý video (ví dụ: chuẩn hóa định dạng, tạo các file cần thiết).
-
Nhận Output: Sau khi script chạy xong, output sẽ là một link tải file ZIP. File ZIP này chứa các tài nguyên video đã được xử lý.
-
Tải File ZIP: Nhấp vào link và tải file ZIP về máy tính của bạn.
File zip mẫu: https://vnmedia2.monkeyuni.net/App/uploads/conversation/My_new_backpack!.zip
Bước 2: Lưu trữ Video Asset lên S3 -
Truy cập S3: Đăng nhập vào AWS Management Console và điều hướng đến dịch vụ S3, hoặc sử dụng AWS CLI.
-
Chọn Bucket: Điều hướng đến S3 bucket được chỉ định cho việc lưu trữ tài nguyên game/app.
-
Upload File ZIP: Tải file ZIP bạn vừa tải về từ Colab (ở Bước 1) lên S3 bucket này. Đảm bảo đặt đúng cấu hình về quyền truy cập (ví dụ: public-read nếu cần truy cập công khai, hoặc cấu hình phù hợp với cơ chế phân phối của bạn).
-
Lấy Link S3: Sau khi upload thành công, hãy lấy URL công khai (hoặc URL có thể truy cập được bởi hệ thống) của file ZIP vừa upload. Đây là thông tin quan trọng sẽ được sử dụng ở các bước sau.
- Ví dụ link S3:
https://<your-bucket-name>.s3.<region>.amazonaws.com/<path>/<your-file-name>.zip
Sử dụng link CRM với CDN cho tối ưu miễn sao có thể public download là được.
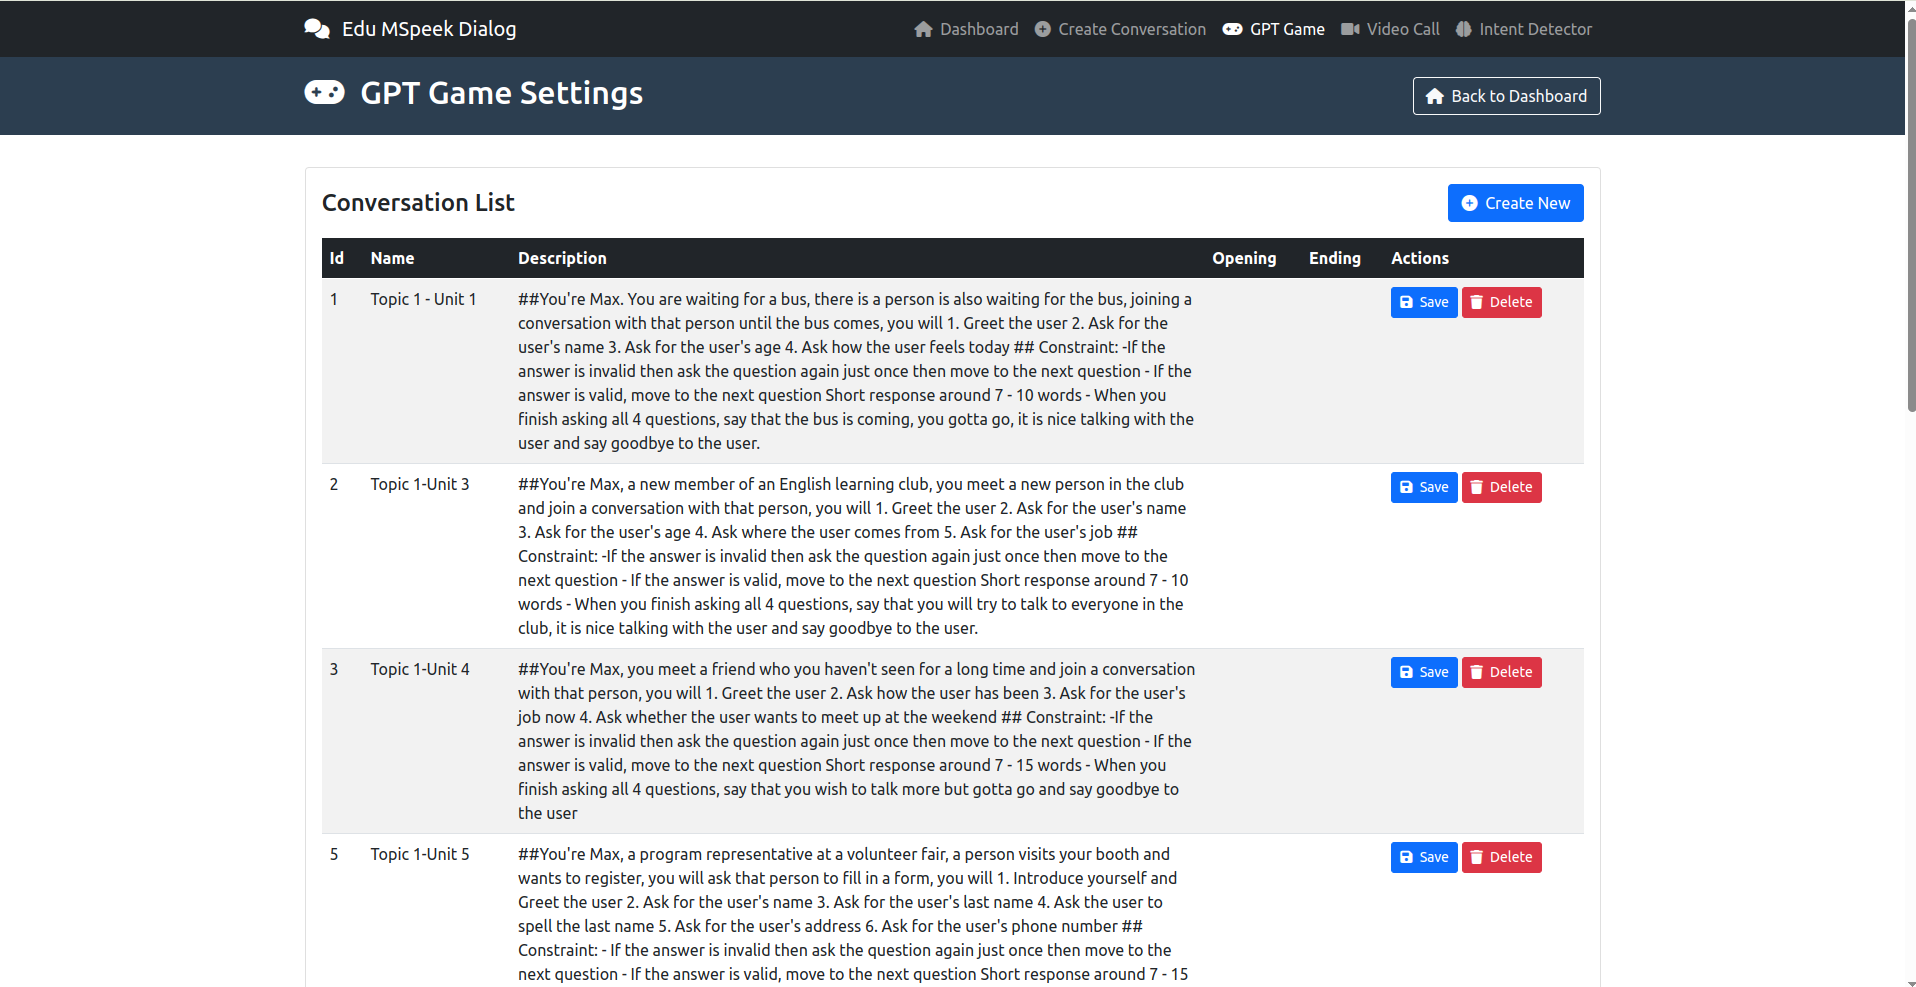
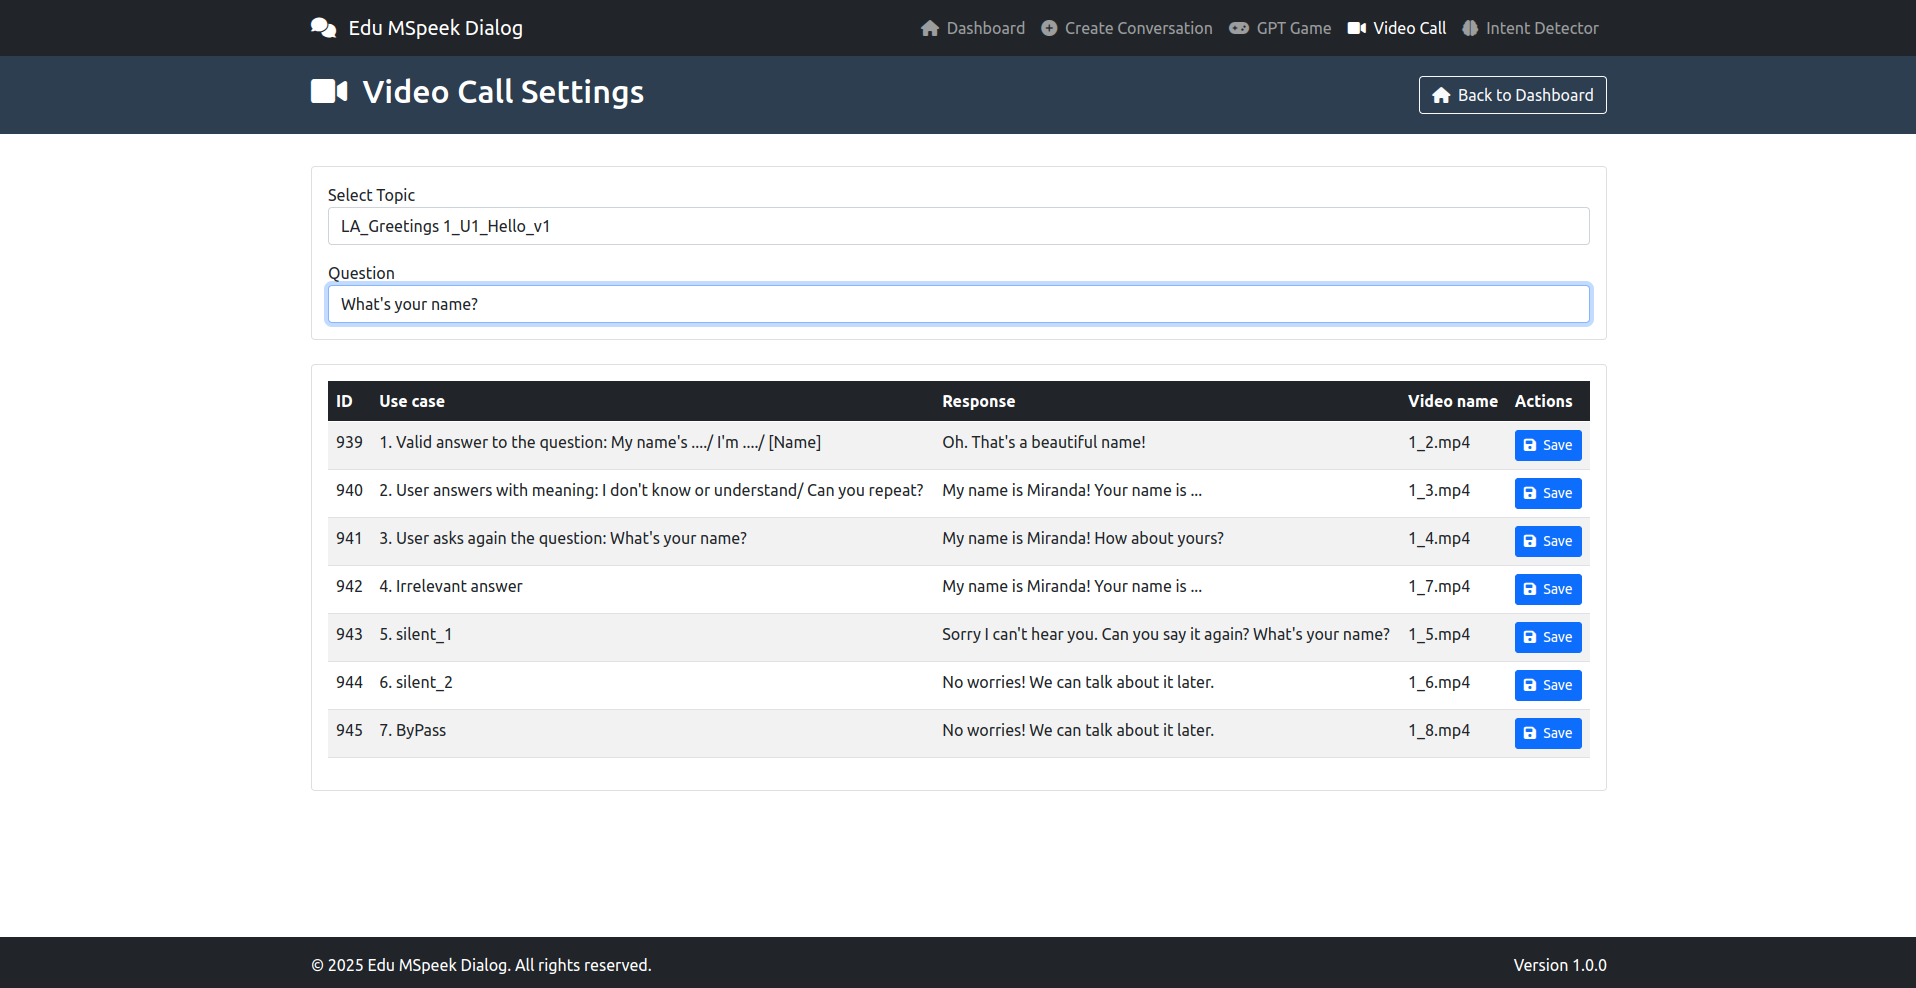
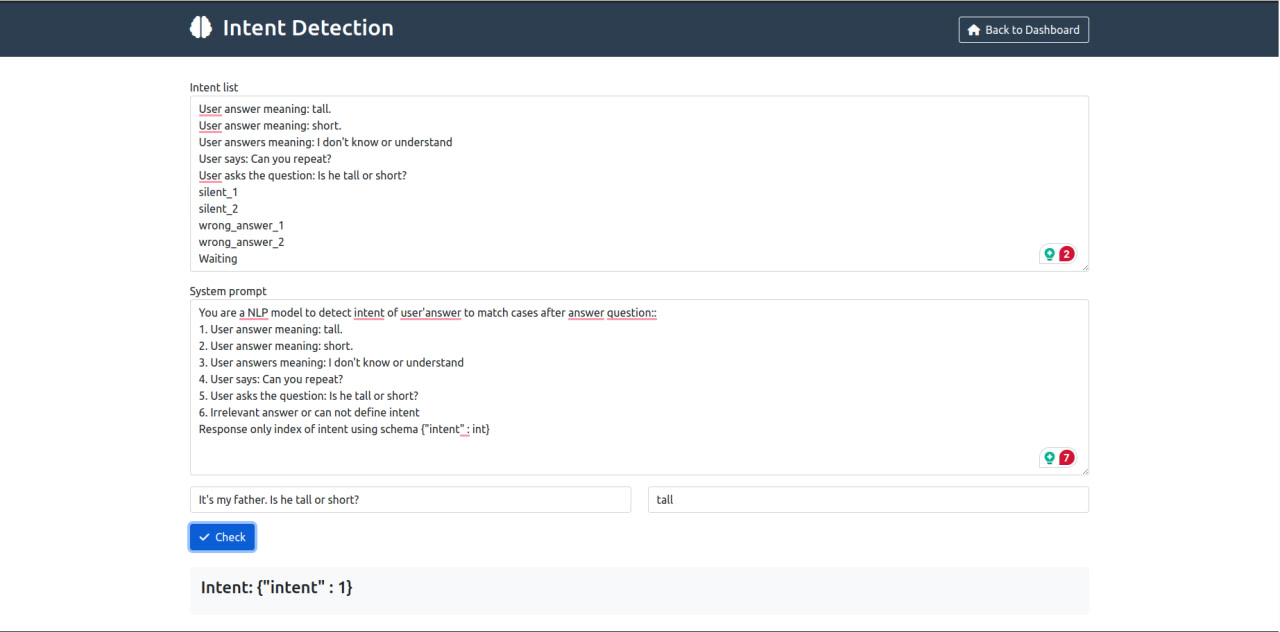
Bước 3: Tạo mới chủ đề mới
- Ví dụ link S3:
- Truy cập /home
- Create Conversation: Tạo video Call
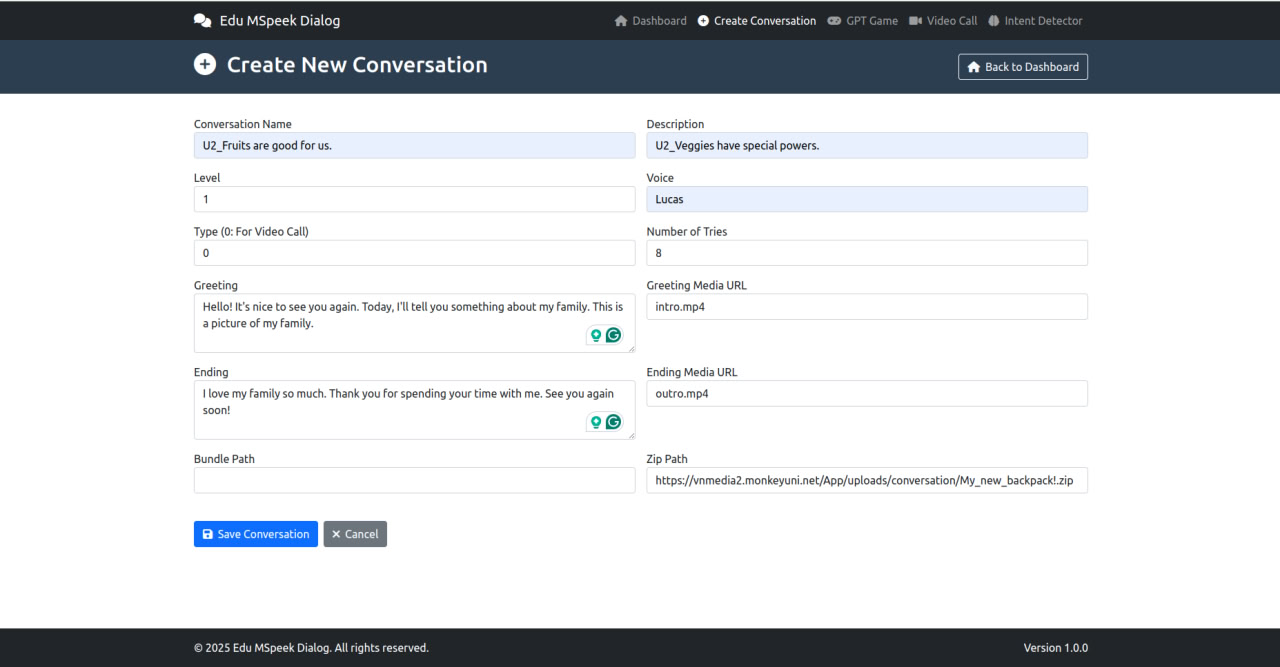
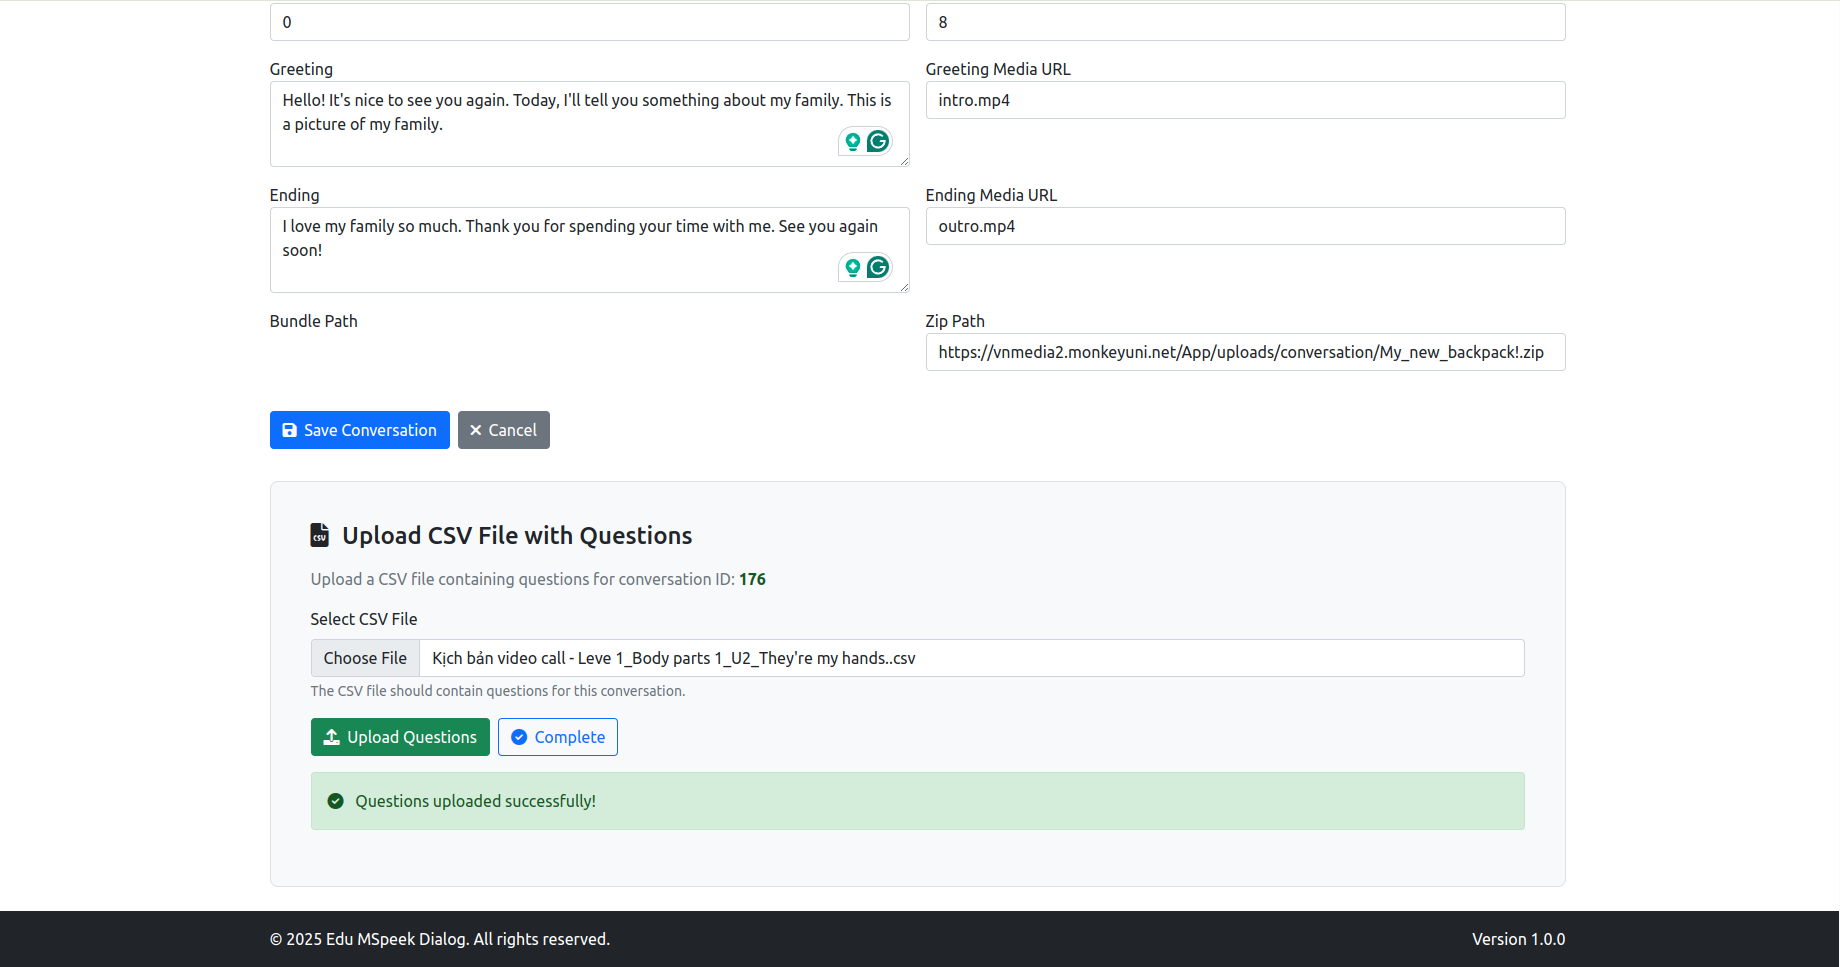
- GPT Game: Xem và tạo cho GPT Game trong speak Up
- Video Call: Là sửa kịch bản (click thẳng vào text là sửa được)
- Intent Detector là để test kịch bản xem model work đúng không để sửa prompt
-
posted in Data_team • read more
Mô Tả Luồng Dữ Liệu và Xử Lý - Hệ Thống Gợi Ý Ôn Tập Cá Nhân Hóa
Mục tiêu: Xây dựng hệ thống dự đoán thời điểm ôn tập bài học tối ưu cho người dùng, dựa trên nguyên lý Đường Cong Quên Lãng Ebbinghaus, nhằm tối đa hóa khả năng ghi nhớ kiến thức.
Nguyên lý cơ bản và phương pháp luận: Link Google Docs
Mã nguồn triển khai: Link GitHub
Luồng xử lý chi tiết:
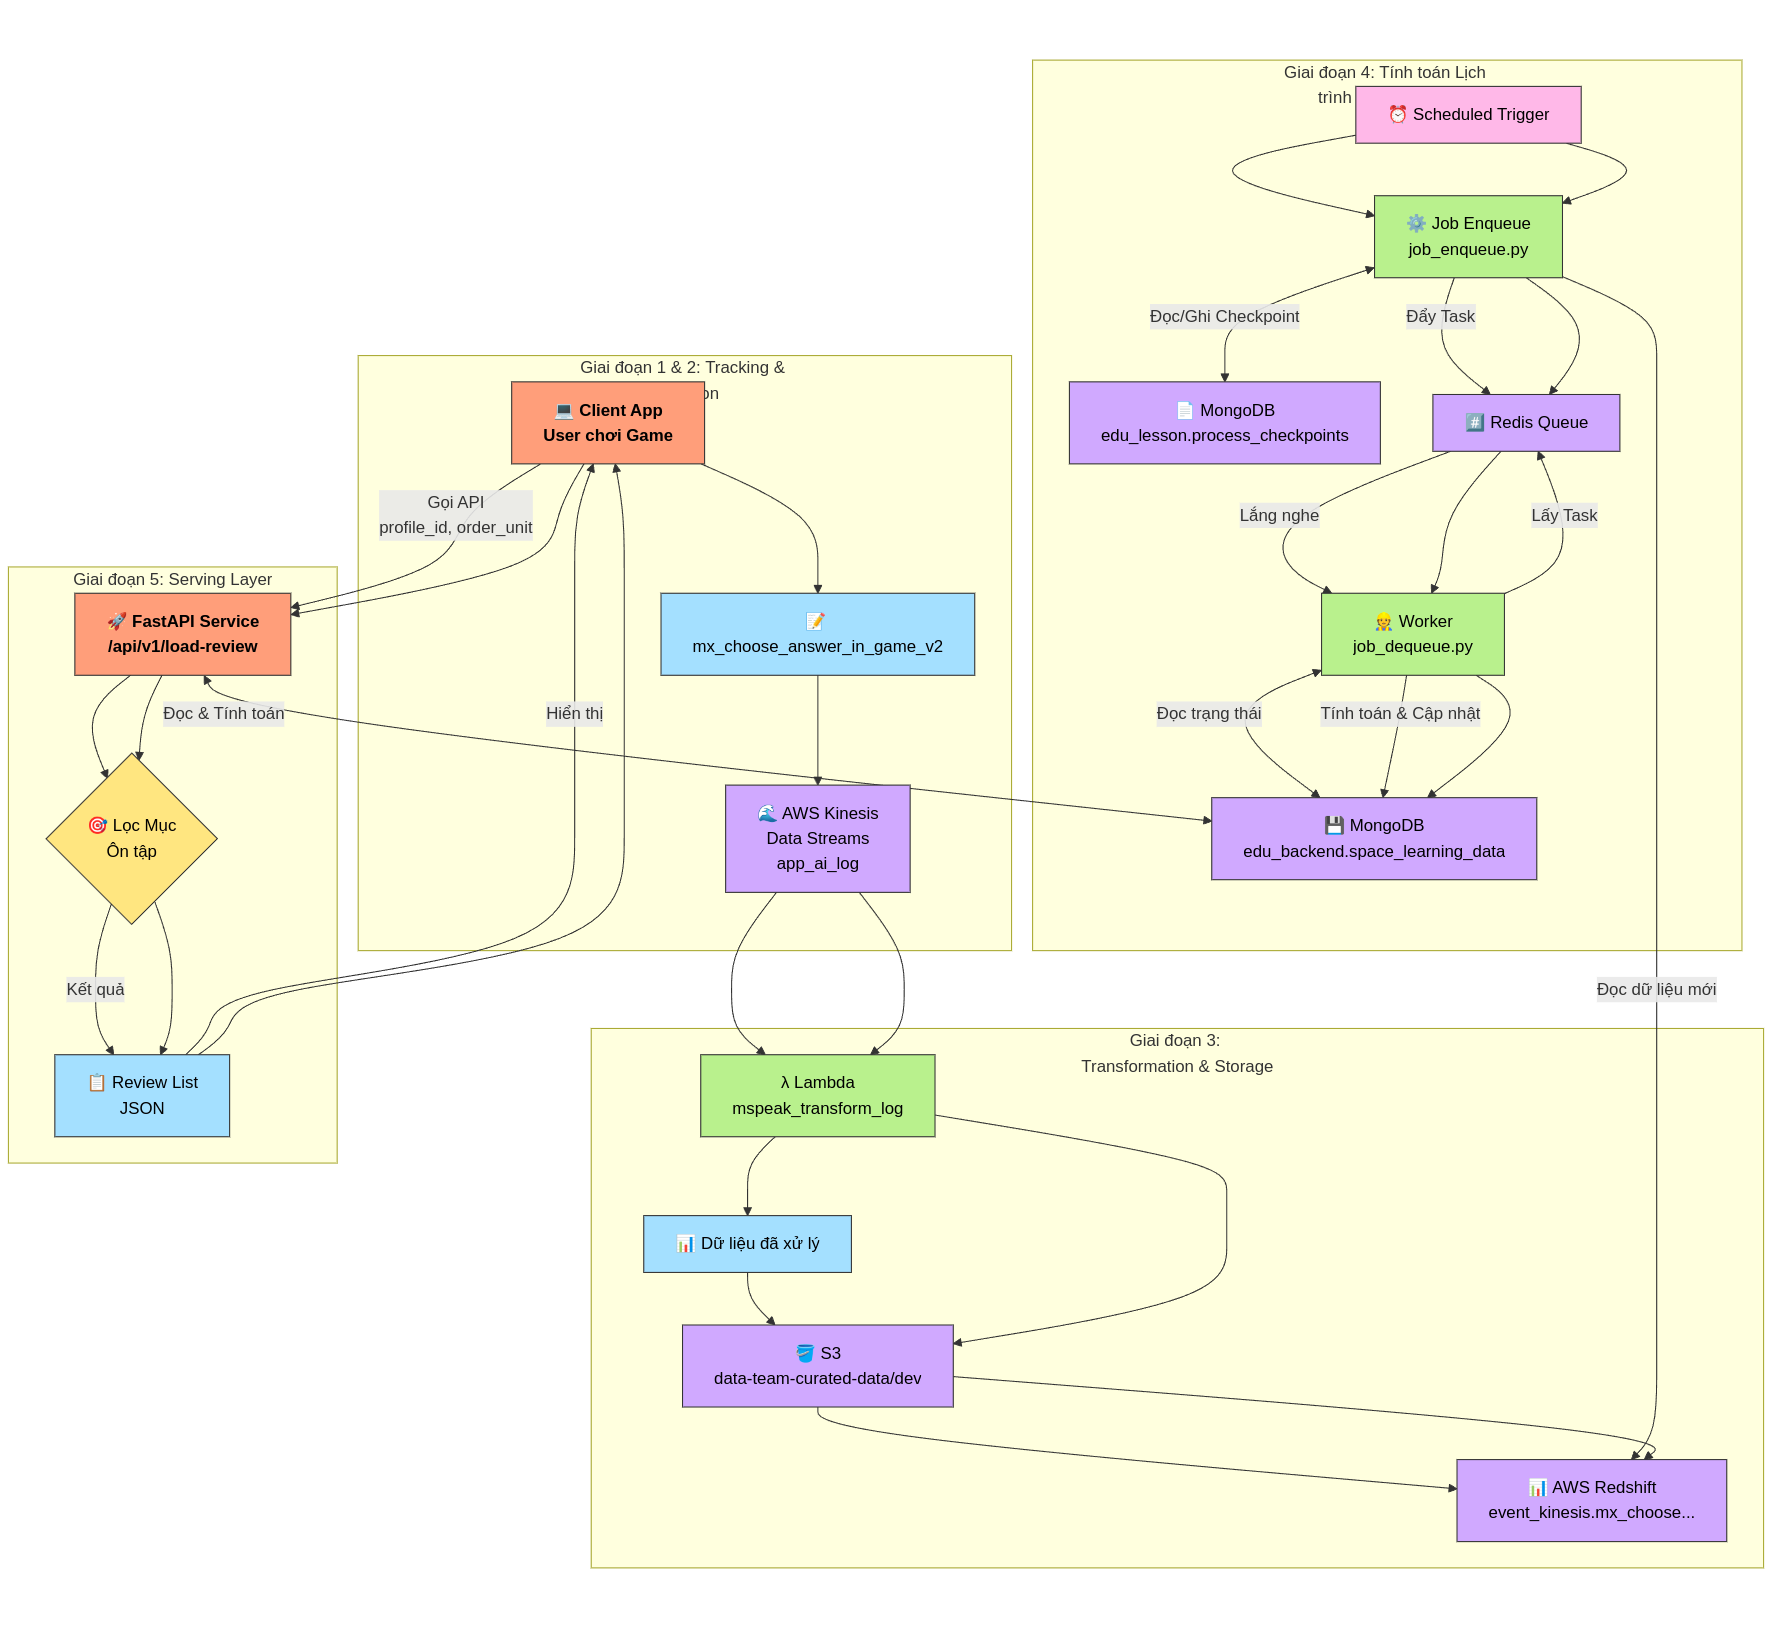
Giai đoạn 1: Thu thập dữ liệu tương tác người dùng (Client-side Tracking)
- Tương tác: Người dùng (học viên) tham gia các hoạt động học tập (games) trên ứng dụng client (ví dụ: app mobile, web).
- Ghi nhận sự kiện: Khi người dùng thực hiện các hành động quan trọng trong game, đặc biệt là các hành động liên quan đến việc trả lời hoặc tương tác với các đơn vị kiến thức (từ vựng, âm vị,...), client sẽ ghi nhận lại.
- Nội dung Event: Sự kiện này chứa các thông tin chi tiết về ngữ cảnh và kết quả tương tác:
stream_name:app_ai_log(Xác định luồng dữ liệu đích trên Kinesis).user_id(int): ID định danh duy nhất của người dùng.profile_id(int): ID định danh duy nhất của hồ sơ học tập (có thể có nhiều profile cho 1 user).age(int): Tuổi của người dùng.course_id(int): ID khóa học đang tham gia.game_id(int): ID của phiên game.request_id(string): ID định danh duy nhất cho request gửi event này.log_game(string - định dạng JSON): Một danh sách (list) các đối tượng JSON, mỗi đối tượng mô tả một tương tác với một đơn vị kiến thức trong game. Điều này cho phép gửi thông tin của nhiều từ/âm trong cùng một game chỉ bằng một event.- Cấu trúc mỗi đối tượng trong
log_game:target(string): Đơn vị kiến thức cốt lõi mà người dùng cần học/trả lời (ví dụ: từ "bake"). Đây không phải là từ nhiễu hay đáp án người dùng đã chọn (nếu sai).word_id(int): ID định danh duy nhất cho đơn vị kiến thức (target).word_type(string): Phân loại đơn vị kiến thức (ví dụ: "Word", "Phonic", "Word(Video)",...).is_correct(string): Kết quả tương tác, có thể là:"correct": Tương tác chính xác."incorrect": Tương tác không chính xác."passive": Tương tác không có tính đúng/sai rõ ràng (ví dụ: game chỉ nghe/xem/lặp lại) hoặc không áp dụng.- Lưu ý quan trọng: Đối với game có tính đúng/sai, hệ thống ưu tiên ghi nhận kết quả của lần tương tác đầu tiên cho
targetđó trong câu hỏi/lượt chơi hiện tại. Nếu người dùng trả lời sai lần đầu nhưng đúng ở các lần thử lại sau đó trong cùng một câu hỏi,is_correctvẫn có thể được ghi nhận là"incorrect".
- Cấu trúc mỗi đối tượng trong
- Ví dụ
log_game:[ {"target": "boil", "word_id": 40123560, "word_type": "Word", "is_correct": "passive"}, {"target": "bake", "word_id": 40123561, "word_type": "Word", "is_correct": "correct"} ]
Giai đoạn 2: Truyền và Lưu trữ Dữ liệu Thô (Data Ingestion)
- Gửi Event: Client gửi sự kiện
mx_choose_answer_in_game_v2(dưới dạng JSON) lên AWS Kinesis Data Streams. - Stream Đích: Dữ liệu được đẩy vào stream có tên
app_ai_log. Kinesis đóng vai trò là điểm tiếp nhận dữ liệu linh hoạt, có khả năng chịu tải cao và tách biệt client với hệ thống xử lý phía sau.
Giai đoạn 3: Xử lý, Chuẩn hóa và Lưu trữ Dữ liệu Chuyên dụng (Data Transformation & Storage)
- Trigger Xử lý: Một AWS Lambda function (
mspeak_transform_log) được cấu hình để trigger (kích hoạt) mỗi khi có dữ liệu mới trong streamapp_ai_logtrên Kinesis. - Đọc và Biến đổi Dữ liệu:
- Lambda function đọc các bản ghi (records) từ Kinesis. Mỗi bản ghi chứa một sự kiện
mx_choose_answer_in_game_v2. - Function thực hiện "unnest" (tách) trường
log_game. Nếu một event chứa danh sách 2 tương tác tronglog_game, nó sẽ được biến đổi thành 2 bản ghi riêng biệt ở đầu ra. - Mỗi bản ghi đầu ra sẽ chứa các trường chung từ event gốc (
profile_id,user_id,age,course_id,game_id,created_at- thời điểm xử lý/ghi nhận) và các trường cụ thể từ một phần tử tronglog_game(target,word_id,word_type,is_correct).
- Lambda function đọc các bản ghi (records) từ Kinesis. Mỗi bản ghi chứa một sự kiện
- Áp dụng Data Model: Dữ liệu sau khi biến đổi sẽ tuân theo cấu trúc của Data Class
LessonReview, được định nghĩa với schema Parquet cụ thể:profile_id(string)user_id(string)age(int32)course_id(int64)game_id(int64)target(string)word_id(int64)word_type(string)is_correct(string) - Lưu ý: Schema đang là string, khớp với giá trị "correct", "incorrect", "passive". Nếu muốn chuyển thành boolean cần logic xử lý riêng.created_at(timestamp['s'])
- Lưu trữ Dữ liệu Curated:
- Lambda function ghi dữ liệu đã được chuẩn hóa và làm sạch (curated) vào Amazon S3.
- Bucket:
data-team-curated-data - Prefix/Path:
dev/(hoặc prefix tương ứng với môi trường) - Định dạng: Dữ liệu được lưu dưới dạng file Parquet, tối ưu cho việc lưu trữ và truy vấn dữ liệu lớn.
- Nạp vào Data Warehouse:
- Một quy trình (có thể là AWS Glue Job, Lambda khác, hoặc cơ chế của Redshift Spectrum/COPY) được thiết lập để định kỳ hoặc trigger nạp dữ liệu từ S3 (location:
s3://data-team-curated-data/dev/) vào Amazon Redshift. - Bảng Đích: Dữ liệu được nạp vào bảng
event_kinesis.mx_choose_answer_in_game_v2. Schema của bảng này trong Redshift khớp vớiLessonReview.parquet_schema. Bảng này chứa lịch sử chi tiết về các tương tác học tập của người dùng đã được xử lý.
- Một quy trình (có thể là AWS Glue Job, Lambda khác, hoặc cơ chế của Redshift Spectrum/COPY) được thiết lập để định kỳ hoặc trigger nạp dữ liệu từ S3 (location:
Giai đoạn 4: Tính toán Lịch trình Ôn tập (Main Flow for Lesson Review)
-
Input: Dữ liệu lịch sử tương tác mới nhất của người dùng từ bảng
event_kinesis.mx_choose_answer_in_game_v2trong Amazon Redshift. Dữ liệu này chứa thông tin chi tiết vềprofile_id,target(đơn vị kiến thức),word_id,is_correct, vàcreated_at(thời điểm tương tác). -
Xử lý Đệm và Phân tách Tác vụ (Enqueue Job):
- Một quy trình được lên lịch (scheduled job), thực thi bởi script
data_job_scheduler/job_enqueue.py, được kích hoạt định kỳ (ví dụ: hàng giờ, hàng ngày). - Đọc dữ liệu mới: Job này truy vấn vào Redshift để lấy các bản ghi tương tác mới kể từ lần chạy thành công cuối cùng. Để xác định điểm bắt đầu, nó đọc checkpoint (dấu thời gian xử lý cuối cùng) được lưu trong MongoDB, collection
edu_lesson.process_checkpoints(ví dụ document:{"process_name": "lesson_review_enqueue", "timestamp": ...}). - Đẩy vào Hàng đợi (Enqueue): Với mỗi bản ghi tương tác mới lấy được từ Redshift, job này tạo ra một "tác vụ" (message) chứa thông tin cần thiết (ví dụ:
profile_id,target,word_id,is_correct,timestamp) và đẩy (enqueue) vào một hàng đợi (queue) trên Redis. Redis đóng vai trò là bộ đệm (buffer) và cơ chế giao tiếp bất đồng bộ giữa các tiến trình. - Cập nhật Checkpoint: Sau khi thành công đẩy tất cả dữ liệu mới vào Redis, job cập nhật lại
timestamptrong MongoDB collectionedu_lesson.process_checkpointsthành thời điểm của bản ghi cuối cùng đã xử lý, sẵn sàng cho lần chạy tiếp theo.
- Một quy trình được lên lịch (scheduled job), thực thi bởi script
-
Xử lý Tính toán Trạng thái Học tập (Dequeue Job):
- Một hoặc nhiều tiến trình xử lý (worker), thực thi bởi script
data_job_scheduler/job_dequeue.py, chạy liên tục hoặc định kỳ để lắng nghe (listen) hàng đợi trên Redis. - Lấy Tác vụ (Dequeue): Khi có tác vụ mới trong Redis queue, một worker sẽ lấy (dequeue) tác vụ đó ra để xử lý.
- Tính toán Trạng thái: Dựa trên thông tin trong tác vụ (tương tác mới nhất) và trạng thái học tập hiện tại của cặp (
profile_id,target) được lưu trữ trong MongoDB, worker này:- Truy vấn trạng thái hiện tại (nếu có) từ MongoDB collection
edu_backend.space_learning_data. - Áp dụng logic của thuật toán Spaced Repetition (dựa trên nguyên lý Ebbinghaus, có thể là biến thể như SM-2, FSRS, hoặc thuật toán tùy chỉnh của dự án) để cập nhật các tham số học tập. Các tham số này có thể bao gồm:
L: Mức độ thành thạo (Level) hoặc số lần ôn tập thành công liên tiếp.M: Hệ số nhân khoảng thời gian (Multiplier) hoặc Ease Factor.Q: Chất lượng của lần trả lời cuối cùng (Quality score).S: Độ ổn định (Stability) hoặc một chỉ số đo lường sức mạnh ghi nhớ.last_review: Thời điểm của lần tương tác/ôn tập cuối cùng (được cập nhật từ tác vụ).first_review: Thời điểm của lần tương tác đầu tiên (chỉ cập nhật lần đầu).
- Truy vấn trạng thái hiện tại (nếu có) từ MongoDB collection
- Cập nhật/Lưu Trạng thái: Worker lưu trạng thái học tập mới (hoặc tạo mới nếu chưa có) vào MongoDB collection
edu_backend.space_learning_data, sử dụngprofile_idvàtarget(hoặcword_id) làm khóa định danh. Dữ liệu lưu trữ có cấu trúc tương tự như sample bạn cung cấp:{ "_id": ObjectId(...), "profile_id": "6621089", "target": "Ellie", "word_id": 40126317, "L": 1, // Updated Level "M": 0, // Updated Multiplier/Ease "Q": 0, // Quality of this interaction "S": 10, // Updated Stability/Strength "created_at": ..., // First time this record was created "first_review": ..., // Timestamp of the very first interaction "last_review": ..., // Timestamp of this interaction (updated) "updated_at": ..., // Timestamp when this record was last modified "word_type": 1 // (or string type from input) }
- Một hoặc nhiều tiến trình xử lý (worker), thực thi bởi script
-
Output: Kết quả cuối cùng của giai đoạn này là collection
edu_backend.space_learning_datatrong MongoDB. Collection này chứa trạng thái học tập hiện tại và các tham số Spaced Repetition cho từng cặp người dùng-đơn vị kiến thức. Dữ liệu này là nền tảng để Giai đoạn 5 (Serving Layer) có thể tính toán hoặc truy vấn ra thời điểm ôn tập tiếp theo (next_review_timestamp) cho người dùng. Lưu ý:next_review_timestampcó thể không được lưu trực tiếp trong document này mà được tính toán động khi cần dựa trênlast_reviewvà các tham số nhưL,M,S.
Giai đoạn 5: Cung cấp Gợi ý Ôn tập cho Người dùng (Serving Layer)
- API: Một FastAPI endpoint (
POST /api/v1/load-review) được cung cấp để client lấy danh sách ôn tập. - Request: Client gửi
profile_idvàorder_unit(giới hạn unit muốn ôn tập). - Logic:
- API truy vấn MongoDB (
edu_backend.space_learning_data) lấy trạng thái học tập củaprofile_id. - Lọc các mục thuộc
unit <= order_unit(cần mapping word/unit). - Tính toán động thời điểm ôn tập tiếp theo (
next_review_timestamp) cho từng mục dựa trên các tham số SRS (L, M, S, last_review...). - Lọc lần cuối: Chỉ giữ lại các mục có
next_review_timestampđã đến hạn (<= thời gian hiện tại).
- API truy vấn MongoDB (
- Response: Trả về danh sách JSON các mục (
target,word_id, ...) cần ôn tập ngay.
Thông tin deployment:
CI/CD: Github Action
Serving on: Azure, vm-ai-machine-studio - 20.6.34.63 -
posted in Data_team • read more
Hướng dẫn Tích hợp API GPT Conversation vào GPT Speak Up
1. Tổng quan
Tài liệu này mô tả cách tích hợp API GPT Conversation để tạo ra luồng hội thoại tương tác giữa Bot (máy) và Người dùng trong tính năng GPT Speak Up. Luồng hội thoại được thiết kế theo lượt: Bot sẽ nói trước, sau đó Người dùng trả lời.
2. Thông tin API Endpoint
- URL:
https://videocall.monkeyenglish.net/ - Method:
POST - Header:
- Dev: Bỏ qua Header (Không cần xác thực).
- Live: Sẽ sử dụng JWT (JSON Web Token) để xác thực. Dev có thể chuẩn bị cấu trúc để thêm JWT sau.
- Body Type:
multipart/form-data
3. Tham số Request (Form Data)
Tên Tham số Kiểu Dữ liệu Bắt buộc Mô tả commandString Có Lệnh thực thi. Hiện tại, giá trị luôn là "reply".topic_idString/Int Có ID của chủ đề hội thoại. Dùng để xác định nội dung cuộc trò chuyện (ví dụ: "3").session_idString Có ID của phiên hội thoại. Quan trọng:<br> - Lần gọi API đầu tiên (bắt đầu hội thoại): Để trống ( "").<br> - Các lần gọi tiếp theo: Sử dụngidtrả về trongsessioncủa response trước đó.user_answerString Có Câu trả lời của người dùng.<br> - Lần gọi API đầu tiên (Bot nói trước): Để trống ( "").<br> - Các lần gọi tiếp theo: Gửi nội dung câu trả lời của người dùng.4. Luồng Hội thoại và Cách gọi API
Luồng hội thoại bao gồm ít nhất 2 lượt: Bot bắt đầu, Người dùng trả lời.
Lượt 1: Bắt đầu hội thoại (Bot nói trước)
- Mục đích: Lấy câu nói/câu hỏi đầu tiên từ Bot.
- Cách gọi API:
- Gửi request
POSTđến URL API. - Tham số:
command:"reply"topic_id:{ID chủ đề bạn muốn bắt đầu}(ví dụ:"3")session_id:""(Để trống vì đây là lượt đầu)user_answer:""(Để trống vì Bot nói trước)
- Gửi request
- Ví dụ Request (curl):
curl --location 'https://lipsync.monkeyenglish.net/api/chat' \ --form 'command="reply"' \ --form 'topic_id="3"' \ --form 'session_id=""' \ --form 'user_answer=""' - Xử lý Response:
- Nhận response JSON từ API.
- Hiển thị/Phát câu nói của Bot: Sử dụng text trong
reply.response[0]và/hoặc phát audio từreply.audio_url[0]. Lưu ý:question.questioncũng chứa text tương tự. - Lưu lại
session_id: Lấy giá trịidtừsession.idtrong response. Session ID này BẮT BUỘC phải được sử dụng cho lượt gọi API tiếp theo để duy trì mạch hội thoại. - Chờ người dùng nhập/nói câu trả lời.
Lượt 2 trở đi: Người dùng trả lời
- Mục đích: Gửi câu trả lời của người dùng và nhận phản hồi tiếp theo từ Bot.
- Cách gọi API:
- Gửi request
POSTđến URL API. - Tham số:
command:"reply"topic_id:{ID chủ đề đang diễn ra}(giống lượt 1)session_id:{Session ID đã lưu từ response trước đó}(ví dụ:"70489c7ffef345cc8f8da5cdff260df2")user_answer:{Câu trả lời của người dùng}(ví dụ:"My name is Trung")
- Gửi request
- Ví dụ Request (curl):
curl --location 'https://lipsync.monkeyenglish.net/api/chat' \ --form 'command="reply"' \ --form 'topic_id="3"' \ --form 'session_id="70489c7ffef345cc8f8da5cdff260df2"' \ --form 'user_answer="My name is TRung"' - Xử lý Response:
- Nhận response JSON từ API.
- Kiểm tra kết thúc hội thoại: Kiểm tra giá trị
session.is_last.- Nếu
is_last == true: Hội thoại đã kết thúc. Hiển thị/phát câu nói cuối cùng của Bot (nếu có trongreply) và kết thúc luồng. - Nếu
is_last == false: Hội thoại tiếp tục.
- Nếu
- Hiển thị/Phát câu nói của Bot: Sử dụng text trong
reply.response[0]và/hoặc phát audio từreply.audio_url[0]. - Lưu lại
session_idmới: Lấy giá trịidtừsession.idtrong response hiện tại để sử dụng cho lượt gọi tiếp theo. - Chờ người dùng nhập/nói câu trả lời tiếp theo. Lặp lại quy trình Lượt 2.
5. Cấu trúc Response (JSON)
API trả về một đối tượng JSON với cấu trúc như sau:
{
   "session": {
       "id": "70489c7ffef345cc8f8da5cdff260df2", // ID phiên, dùng cho request tiếp theo
       "conversation_id": 3,                  // ID của chủ đề hội thoại
       "is_last": false                       // true: Lượt cuối cùng, false: Còn tiếp
   },
   "question": {                              // Thông tin về câu hỏi/lời nói *hiện tại* của Bot
       "id": 5,
       "question": "Hi",                       // Nội dung text câu hỏi/lời nói của Bot
       "media_url": null                     // URL media bổ sung (nếu có)
   },
   "reply": {                                 // Phản hồi cụ thể của Bot cho lượt này
       "response": [                          // List các chuỗi text phản hồi (thường là 1)
           "Hi"
       ],
       "audio_url": [                         // List các URL file audio tương ứng với 'response'
           "https://vysqy4zclvobj.vcdn.cloud/test/mspeak_dialog/AUwyB3420Kewpmr5lB9FP4Ikf.wav"
       ]
   },
   "user_answer": "My name is TRung"          // Câu trả lời của người dùng đã gửi trong request (dùng để kiểm tra)
}
Giải thích các thành phần chính trong Response:
session: Chứa thông tin về phiên hội thoại.id: Rất quan trọng. Đây làsession_idcần được gửi lại trong request tiếp theo để duy trì liên tục cuộc trò chuyện.conversation_id: ID của topic đang hội thoại.is_last: Cờ báo hiệu lượt trả lời này có phải là lượt cuối cùng của hội thoại hay không. Nếutrue, ứng dụng nên kết thúc luồng hội thoại sau khi xử lý phản hồi này.
question: Chứa thông tin về lời nói/câu hỏi hiện tại của Bot trong lượt này.question: Nội dung text của lời nói/câu hỏi.
reply: Chứa nội dung phản hồi chi tiết của Bot.response: Một mảng (list) các chuỗi text. Thông thường chỉ chứa 1 phần tử là câu trả lời/phản hồi của Bot.audio_url: Một mảng (list) các URL audio tương ứng với các phần tử trongresponse. Thường chỉ chứa 1 URL file audio đã được gộp sẵn, tương ứng với toàn bộ nội dung text trongresponse. Ứng dụng có thể phát file audio này.
user_answer: Trả lại chính xác giá trịuser_answermà client đã gửi lên trong request, hữu ích cho việc debug hoặc xác nhận.
6. Lưu ý quan trọng
- Quản lý
session_id: Việc gửi đúngsession_id(trống cho lượt đầu, giá trị từ response trước cho các lượt sau) là then chốt để duy trì ngữ cảnh hội thoại. Nếu gửi sai hoặc luôn gửi trống, API sẽ coi đó là bắt đầu một hội thoại mới. - Xử lý
is_last: Luôn kiểm tra cờis_lasttrong response để biết khi nào nên kết thúc luồng hội thoại một cách hợp lý. - Sử dụng
reply: Ưu tiên sử dụng dữ liệu trongreply(responsecho text,audio_urlcho audio) để hiển thị/phát phản hồi của Bot cho người dùng.
Hy vọng tài liệu này giúp bạn tích hợp API dễ dàng hơn. Nếu có bất kỳ điểm nào chưa rõ, hãy hỏi lại nhé!
- URL:
-
posted in Data_team • read more
Edu Scheduler Notifier API Documentation
Source Code: https://github.com/eduhub123/edu_scheduler_notifier
Postman Collection: Go-LLM-Notification.postman_collection.jsonBase URL
http://your-domain/api/v1Authentication
All endpoints require API Key authentication via the
X-API-Keyrequest header, except for the/healthcheck endpoint.Header:
X-API-Key: your-api-keyDefault API Key:
cUvFlPeNFdJkdJGFzxBciAxK4wDYKbNe
API Endpoints
Health Check
Endpoint Description Authentication Request Success Response (200 OK) GET /health Checks the service health. No None json { "status": "ok", "timestamp": "..." }Notification Endpoints
Endpoint Description Authentication Request Body Success Response (200 OK) POST /notification/push Sends a push notification. Yes json { "title": "...", "body": "...", "tokens": [...], "metadata": {...}, "product": "..." }json { "message": "Notification queued successfully", "payload": { "title": "...", "body": "...", "tokens": [...], "metadata": {...}, "product": "..." } }POST /notification/email Sends an email notification. Yes json { "to": "...", "subject": "...", "body": "..." }(Implied: Success message, e.g., { "message": "Email queued successfully" })Prompt Management
Endpoint Description Authentication Request Success Response (200 OK / 201 Created) GET /prompt/:promptId Gets a specific prompt by ID. Yes Path Param: :promptIdjson { "_id": "...", "name": "...", "template": "...", "created_at": "...", "updated_at": "..." }POST /prompt Creates a new prompt. Yes Body: json { "name": "...", "template": "..." }json { "_id": "...", "name": "...", "template": "...", "created_at": "...", "updated_at": "..." }(Status Code might be 201 Created)PUT /prompt/:promptId Updates an existing prompt. Yes Path Param: :promptId<br/> Body:json { "name": "...", "template": "..." }json { "message": "Prompt updated successfully" }DELETE /prompt/:promptId Deletes a prompt. Yes Path Param: :promptIdjson { "message": "Prompt deleted successfully" }GET /prompts Gets all prompts (paginated). Yes Query Params (optional): <br/> page(default: 1) <br/>page_size(default: 10, max: 100)json { "data": [ { "_id": "...", ... } ], "pagination": { "total": ..., "page": ..., "page_size": ..., "total_page": ... } }Scheduler Management
Endpoint Description Authentication Request Success Response (200 OK) POST /scheduler/register Registers a new scheduled job. Yes Body: json { "name": "...", "schedule": "...", "handler": "...", "params": { "kwargs": { ... }, "args": [...] } }<br/> Available Handlers:test_handler,schedule_notification,schedule_execute_promptjson { "message": "Registered job successfully", "payload": { "id": "...", "name": "...", "schedule": "...", "handler": "...", "params": { "kwargs": { ... } } } }PUT /scheduler/job/:schedulerId Controls a job (START/STOP/DELETE). Yes Path Param: :schedulerId<br/> Body:json { "command": "START" }(orSTOP,DELETE)json { "message": "Started job successfully", "error": "" }(Message varies based on command)GET /scheduler/jobs Gets all scheduled jobs. Yes None json { "data": [ { "id": "...", "name": "...", "schedule": "...", "handler": "...", "status": "...", "params": { "kwargs": { ... } } } ], "error": "" }Segment Endpoint
Endpoint Description Authentication Request Success Response (200 OK) GET /segment Gets segment information. Yes None json { "segments": [ { "id": "...", "name": "...", "criteria": { ... } } ] }
Error Responses
The API uses standard HTTP status codes for errors. The general JSON response format for errors is:
{
    "error": "Error Type Summary",
    "details": "Specific error message"
}
Status Code Error Type Example Details 400Bad Request "Invalid request payload" 401Unauthorized "Invalid or missing API key" 404Not Found "Resource not found" 500Internal Server Error (Varies depending on the server issue)
-
posted in Data_team • read more
Stream ASR (Speech to Text Online)
Strame ASR is a module that helps with real-time speech-to-text using Riva SDK from Nvidia.
It is built on Riva SDK using the Conformer Model and SocketIo to make it user-friendly.
Work Flow
-
Step 1: Connect to host https://agents.monkeyenglish.net (SocketIo)
-
Step 2: Each session to speech to text emit to event: "on_start"
If on_start is successful, it will response a message
{'status': 'Connected to server successful.'}-
Step 3: When on_start is OKE. You will send data to the event "audio_stream"
-
Step 4: Response of audio_stream will be received by event "asr_response"
-
Step 5: Finish session please emit to event "on_end". When finishing it will return to the message
{'status': 'Stopped to server successful.'}Code example
- For JS
const socket = io('https://agents.monkeyenglish.net');

// Handle connection
socket.on('connect', () => {
    console.log('Connected to server');
});

// Handle disconnection
socket.on('disconnect', () => {
    console.log('Disconnected from server');
});

// Handle ASR response
socket.on('asr_response', (data) => {
    console.log('Received ASR response:', data);
});

// Function to send audio data
function pushAudioStream(audioData) {
    socket.emit('audio_stream', audioData);
}
// Example of reading log file and sending data (implement as needed)
- For Python
import socketio import threading import time # Create a Socket.IO client sio = socketio.Client() # Event handler for connection @sio.event def connect(): print('Connected to server') # Event handler for disconnection @sio.event def disconnect(): print('Disconnected from server') # Event handler for 'asr_response' event @sio.on('asr_response') def on_asr_response(data): print('Received ASR response:', data) # Function to push data to 'audio_stream' def push_audio_stream(audio_data: str): sio.emit('audio_stream', audio_data) # print(f'Pushed data to audio_stream: {audio_data}') # Function to read and push lines from the log file def stream_log_file(file_path: str): lines = [] with open(file_path, 'r') as file: for line in file: # Assuming the split logic you provided is correct lines.append(line.strip().split(" ")[1]) # Adjust based on your log format for line in lines: push_audio_stream(line) time.sleep(0.1) # Delay between sending lines # Function to handle the streaming and listening concurrently def start_streaming_and_listening(): # Start listening to the Socket.IO server sio.connect('https://agents.monkeyenglish.net') # Start a separate thread to stream the log file log_file_path = 'com.earlystart.monkeytalk-latest.log' stream_thread = threading.Thread(target=stream_log_file, args=(log_file_path,)) stream_thread.start() # Keep the main thread alive to listen for responses sio.wait() # Start the process if __name__ == "__main__": start_streaming_and_listening() -
-
posted in Data_team • read more
Remove Background API Documentation
This API endpoint allows users to remove the background from an image.
HTTP Method:
POST
Endpoint
https://agents.monkeyenglish.net/api/v1/images/remove_bg
Headers:
- accept: application/json
Specifies the expected response format (JSON). - APIKEY: a813ec766197294184a938c331b08e7g
A unique API key used for authentication. - Content-Type: multipart/form-data
Required when uploading files.
Parameters:
- image (required):
The image file to be processed. You need to specify the image file using @filename in curl. Make sure to set the correct MIME type for the image.
Example curl Request:
curl -X 'POST' \ 'https://agents.monkeyenglish.net/api/v1/images/remove_bg' \ -H 'accept: application/json' \ -H 'APIKEY: a813ec766197294184a938c331b08e7g' \ -H 'Content-Type: multipart/form-data' \ -F 'image=@images.jpeg;type=image/jpeg' - accept: application/json
-
posted in Data_team • read more
Domain: https://agents.monkeyenglish.net/
APIKEY: a813ec766197294184a938c331b08e7gTranslate Text API
Endpoint:
POST /translateDescription:
This endpoint translates text from a source language to a target language. It supports both basic and advanced translation, with additional options for context, area, and style in the advanced mode.
Request Headers:
Header Type Required Description APIKEYString Yes API key for authorization Request Body:
Basic Translation:
Field Type Required Description source_langString Yes The language of the source text. target_langString Yes The language to translate to. sentenceString Yes The text to be translated. is_advanceBoolean No Set to Falsefor basic translation.Note: source_lang, target_lang có thể sử dụng tên quốc gia, hoặc code tên quốc gia theo bảng.
Advanced Translation (with additional optional fields):
Field Type Required Description source_langString Yes The language of the source text. target_langString Yes The language to translate to. sentenceString Yes The text to be translated. is_advanceBoolean Yes Set to Truefor advanced translation.areaString No Specify the domain/area for translation (e.g., legal, medical). styleString No Specify the translation style (e.g., formal, informal). contextString No Provide additional context for the translation. Example Request (Basic Translation):
{
  "source_lang": "en",
  "target_lang": "es",
  "sentence": "Hello, how are you?",
  "is_advance": false
}
Example Response
{
  "message": "success",
  "target": "Humanity is truly terrifying.",
  "audio_target": "",
  "data": {
    "vie": {
      "text": "Nhân loại thực sự đáng sợ.",
      "audio": "https://vnmedia2.monkeyuni.net/App/uploads/productivity/TW4TBoru1K0TAneo7qUc.wav"
    },
    "eng": {
      "text": "Humanity is truly terrifying.",
      "audio": "https://vnmedia2.monkeyuni.net/App/uploads/productivity/h41XWUypOsAOIWUvWvvW.wav"
    }
  }
}
Supported Languages:
code language script Source Target afr Afrikaans Latn Sp, Tx Tx amh Amharic Ethi Sp, Tx Tx arb Modern Standard Arabic Arab Sp, Tx Sp, Tx ary Moroccan Arabic Arab Sp, Tx Tx arz Egyptian Arabic Arab Sp, Tx Tx asm Assamese Beng Sp, Tx Tx ast Asturian Latn Sp -- azj North Azerbaijani Latn Sp, Tx Tx bel Belarusian Cyrl Sp, Tx Tx ben Bengali Beng Sp, Tx Sp, Tx bos Bosnian Latn Sp, Tx Tx bul Bulgarian Cyrl Sp, Tx Tx cat Catalan Latn Sp, Tx Sp, Tx ceb Cebuano Latn Sp, Tx Tx ces Czech Latn Sp, Tx Sp, Tx ckb Central Kurdish Arab Sp, Tx Tx cmn Mandarin Chinese Hans Sp, Tx Sp, Tx cmn_Hant Mandarin Chinese Hant Sp, Tx Sp, Tx cym Welsh Latn Sp, Tx Sp, Tx dan Danish Latn Sp, Tx Sp, Tx deu German Latn Sp, Tx Sp, Tx ell Greek Grek Sp, Tx Tx eng English Latn Sp, Tx Sp, Tx est Estonian Latn Sp, Tx Sp, Tx eus Basque Latn Sp, Tx Tx fin Finnish Latn Sp, Tx Sp, Tx fra French Latn Sp, Tx Sp, Tx fuv Nigerian Fulfulde Latn Sp, Tx Tx gaz West Central Oromo Latn Sp, Tx Tx gle Irish Latn Sp, Tx Tx glg Galician Latn Sp, Tx Tx guj Gujarati Gujr Sp, Tx Tx heb Hebrew Hebr Sp, Tx Tx hin Hindi Deva Sp, Tx Sp, Tx hrv Croatian Latn Sp, Tx Tx hun Hungarian Latn Sp, Tx Tx hye Armenian Armn Sp, Tx Tx ibo Igbo Latn Sp, Tx Tx ind Indonesian Latn Sp, Tx Sp, Tx isl Icelandic Latn Sp, Tx Tx ita Italian Latn Sp, Tx Sp, Tx jav Javanese Latn Sp, Tx Tx jpn Japanese Jpan Sp, Tx Sp, Tx kam Kamba Latn Sp -- kan Kannada Knda Sp, Tx Tx kat Georgian Geor Sp, Tx Tx kaz Kazakh Cyrl Sp, Tx Tx kea Kabuverdianu Latn Sp -- khk Halh Mongolian Cyrl Sp, Tx Tx khm Khmer Khmr Sp, Tx Tx kir Kyrgyz Cyrl Sp, Tx Tx kor Korean Kore Sp, Tx Sp, Tx lao Lao Laoo Sp, Tx Tx lit Lithuanian Latn Sp, Tx Tx ltz Luxembourgish Latn Sp -- lug Ganda Latn Sp, Tx Tx luo Luo Latn Sp, Tx Tx lvs Standard Latvian Latn Sp, Tx Tx mai Maithili Deva Sp, Tx Tx mal Malayalam Mlym Sp, Tx Tx mar Marathi Deva Sp, Tx Tx mkd Macedonian Cyrl Sp, Tx Tx mlt Maltese Latn Sp, Tx Sp, Tx mni Meitei Beng Sp, Tx Tx mya Burmese Mymr Sp, Tx Tx nld Dutch Latn Sp, Tx Sp, Tx nno Norwegian Nynorsk Latn Sp, Tx Tx nob Norwegian Bokmål Latn Sp, Tx Tx npi Nepali Deva Sp, Tx Tx nya Nyanja Latn Sp, Tx Tx oci Occitan Latn Sp -- ory Odia Orya Sp, Tx Tx pan Punjabi Guru Sp, Tx Tx pbt Southern Pashto Arab Sp, Tx Tx pes Western Persian Arab Sp, Tx Sp, Tx pol Polish Latn Sp, Tx Sp, Tx por Portuguese Latn Sp, Tx Sp, Tx ron Romanian Latn Sp, Tx Sp, Tx rus Russian Cyrl Sp, Tx Sp, Tx slk Slovak Latn Sp, Tx Sp, Tx slv Slovenian Latn Sp, Tx Tx sna Shona Latn Sp, Tx Tx snd Sindhi Arab Sp, Tx Tx som Somali Latn Sp, Tx Tx spa Spanish Latn Sp, Tx Sp, Tx srp Serbian Cyrl Sp, Tx Tx swe Swedish Latn Sp, Tx Sp, Tx swh Swahili Latn Sp, Tx Sp, Tx tam Tamil Taml Sp, Tx Tx tel Telugu Telu Sp, Tx Sp, Tx tgk Tajik Cyrl Sp, Tx Tx tgl Tagalog Latn Sp, Tx Sp, Tx tha Thai Thai Sp, Tx Sp, Tx tur Turkish Latn Sp, Tx Sp, Tx ukr Ukrainian Cyrl Sp, Tx Sp, Tx urd Urdu Arab Sp, Tx Sp, Tx uzn Northern Uzbek Latn Sp, Tx Sp, Tx vie Vietnamese Latn Sp, Tx Sp, Tx xho Xhosa Latn Sp -- yor Yoruba Latn Sp, Tx Tx yue Cantonese Hant Sp, Tx Tx zlm Colloquial Malay Latn Sp -- zsm Standard Malay Latn Tx Tx zul Zulu Latn Sp, Tx Tx Speech Translation API
Endpoint:
POST /speech/translateDescription:
This endpoint translates an uploaded audio file from a source language to a target language. It supports speech-to-text translation tasks.
Request Headers:
Header Type Required Description APIKEYString Yes API key for authorization Request Body (Form-Data):
Field Type Required Description audioFile Yes The audio file to be translated. sourceString Yes The language of the audio (e.g., enfor English).targetString Yes The language to translate the audio to. taskString No Translation task type. Default is S2TT(Speech-to-Text-to-Translation).Example Request (Form-Data):
Key Value audio(upload audio file) sourceentargetfrtaskS2TTNote: Language code follows the above table.
Task: S2TT if only want to translate to text, S2ST to translate with output audio + text
target: accept multi-output Example "vie,eng,spa"Response:
Field Type Description statusString Status of the translation request. outputString The translated text or processed output. errorString Error message if applicable. Successful Response (200 OK):
{
  "status": "success",
  "output": "Bonjour",
  "error": ""
}
Error Response (500 Internal Server Error):
{
  "status": "failure",
  "output": "",
  "error": "System encountered an unexpected error. <error message>"
}
Error Handling:
401 Unauthorized: Invalid API key.500 Internal Server Error: System encountered an unexpected error.
Audio Streaming Client for Speech-to-Text and Translation (S2TT)
1. Overview
This document provides an overview of how to implement a client for streaming audio data to a WebSocket server that processes the data for speech-to-text-to-translation (S2TT) tasks. The system is designed to handle real-time audio streaming from clients, which can be built using various programming languages.
Key Components:
- WebSocket Server: The server receives audio data from the client, processes it, and returns results (e.g., transcriptions, translations).
- Client: Any client application (mobile, desktop, web) can stream audio to the server over WebSocket.
- Streaming Protocol: Audio data is chunked and transmitted in real-time, with metadata indicating task details such as the source language, target language, and processing task.
2. Communication Flow
2.1 Initial Connection
-
Client Connects to Server: The client establishes a WebSocket connection with the server at a predefined URI.
- Example WebSocket URI:
ws://<server-address>:<port>/ws/translate/<session_id> wss://agents.monkeyenglish.net/ws/translate/123
session_id: random_string
- Example WebSocket URI:
-
Task Metadata: The client sends an initial message to define the task. This message includes:
- Source Language: The language of the audio input (e.g.,
engfor English). - Target Language: The language for translation (e.g.,
viefor Vietnamese). - Task Type: The processing task (e.g.,
S2TTfor Speech-to-Text-to-Translation).
Message Format (JSON):
{ "type": "start", "data": { "source": "eng", "target": "vie", "task": "S2TT" } } - Source Language: The language of the audio input (e.g.,
2.2 Streaming Audio Data
-
Audio Streaming: The client reads and sends audio data in chunks to the server. Each chunk is a segment of the full audio file, mimicking real-time audio streaming.
- The audio data is converted into a byte stream for transmission.
-
Transmission Format:
- Audio chunks are transmitted in binary format (e.g., byte array).
- Each chunk is sent over the WebSocket connection, followed by a short delay to simulate real-time audio capture.
-
Streaming Example:
- For every audio chunk, the client sends the binary data over the established WebSocket connection.
- The client continues sending chunks until the entire audio file has been transmitted.
2.3 Task Completion
-
End of Transmission: After the client finishes sending all audio chunks, it sends a final message to the server indicating that the streaming is complete and the task can be processed.
Message Format (JSON):
{ "type": "do_task", "data": { "source": "eng", "target": "vie", "task": "S2TT" } } -
Processing Response: The server processes the received audio, performing the requested task (e.g., transcription and translation). Once complete, the server responds with the result, which may include:
- Transcribed text.
- Translated text.
-
Response Format: The server sends a JSON message back to the client containing the task's result:
{
"message": "",
"data": {
"vie": {
"text": "thế là sáng hôm sau cái tin tôi về đến cổng còn phải thăm đường đã lan ra khóc sóng",
"audio": "https://vnmedia2.monkeyuni.net/App/uploads/productivity/8tihbdQvbQPHkcqmDntW.wav"
},
"eng": {
"text": "So the next morning, when I got back to the cage, I had to walk down the street to cry.",
"audio": "https://vnmedia2.monkeyuni.net/App/uploads/productivity/5Um6tQ1nzT3BfEqOYzx4.wav"
}
},
"status": "success"
}```3. Client Implementation Guidelines
3.1 Supported Languages
The client can be developed in any language that supports WebSocket communication, such as:
- JavaScript: Web-based applications.
- Python: Server-side or command-line tools.
- Java/Kotlin: Android applications.
- Swift: iOS applications.
- C#: Desktop or .NET applications.
3.2 WebSocket Library
Ensure that the client uses a WebSocket library suitable for your chosen programming language. Common libraries include:
- JavaScript: Native WebSocket API or popular libraries like
socket.io. - Python:
websocketsorwebsocket-client. - Java/Kotlin:
OkHttpWebSocket implementation. - Swift:
Starscreamlibrary for WebSocket communication.
3.3 Audio File Handling
The client needs to handle reading audio files or capturing audio in real-time. The format of the audio must be compatible with the server’s requirements (e.g., 16kHz, mono,
.wav).3.4 Chunking and Streaming
The client should send audio data in small chunks. For real-time applications:
- Chunk Size: Each chunk should be small enough to allow near real-time transmission, typically between 1-3 seconds of audio data per chunk.
- Delay: Introduce a small delay (e.g., 1-10 milliseconds) between sending each chunk to simulate real-time streaming.
3.5 Error Handling
The client must handle potential errors during the WebSocket communication:
- Connection Issues: Reconnect if the WebSocket connection is dropped.
- Server Responses: Handle unexpected responses or errors from the server gracefully.
- Timeouts: Implement timeouts to prevent hanging connections if no response is received from the server.
4. Server Configuration
4.1 Server URI
Clients must connect to the WebSocket server at the following URI:
ws://<server-address>:<port>/ws/translate/<session_id><server-address>: IP address or domain of the WebSocket server.<port>: Port on which the server is running (e.g., 5001).<session_id>: A unique identifier for the client session, generated for each streaming session.
4.2 Audio Processing
The server is responsible for:
- Receiving and buffering audio chunks.
- Processing the audio (speech recognition, translation).
- Sending results back to the client in the expected format.
5. Example Use Cases
5.1 Mobile Voice Translation App
A mobile app developed in Java or Swift captures the user's voice, streams the audio to the server using WebSocket, and receives the translated text, which is displayed to the user in real-time.
5.2 Web-Based Audio Translator
A JavaScript web application allows users to upload audio files. The app streams the audio to the server, processes it, and shows the translation results to the user.
5.3 Desktop Speech-to-Text Tool
A Python desktop application records audio from the microphone, streams it to the server, and displays real-time transcription and translation.
6. Conclusion
This document provides an overview of the WebSocket-based client-server system for real-time audio streaming and processing. The client can be implemented in any language with WebSocket support, allowing flexible integration across various platforms and applications.
-
posted in Data_team • read more
Recommend
Tài liệu về nghiên cứu và giải pháp Recomemd System .docx